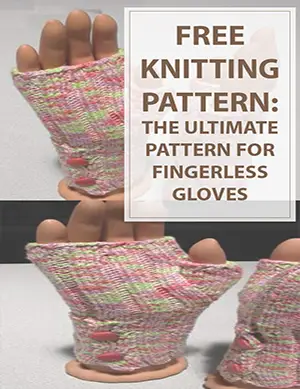
Buttoned Up Fingerless Gloves Knitting Pattern
Buttoned up fingerless gloves knitting pattern is designed from Cathy Campbell.It’s an easy knitting pattern to make a gorgeous pair of knitted fingerless gloves with buttons. Size fits for all hands. Enjoy knitting!!
Buttoned Up Fingerless Gloves Knitting Pattern Materials
Materials: 2 balls Crystal Palace Yarns Mikado Ribbon, #9706 “tulips”
Crystal Palace Yarns Bamboo 6” Double-pointed Needles, US #5, or size needed to obtain gauge Button Maker and 2 button shells, 3/8” in diameter and 4 x 4” swatch of Dupioni Silk or other fabric OR 2 ready-made buttons.
Buttoned Up Fingerless Gloves Knitting Pattern Instructions
Knitting Pattern Right Hand:
CO 50 stitches.
Row 1 (Right Side): purl 1, knit 1, purl 1, knit 1,purl 1, (knit 3, purl 2) 8x, knit 1, purl 1, knit 1, purl 1, knit 1
Row 2 (Wrong Side): purl 1, knit 1, purl 1, knit 1,purl 1, (knit 2, purl 3) 8x, knit 1, purl 1, knit 1, purl 1, knit 1
Repeat these 2 rows for 1¼”.
Make buttonholes:
Row 1 (Right Side): purl 1, knit 1, purl 1, knit 1,purl 1, (knit 3, purl 2) 8x, BO 2 stitches, work pattern to end of row.
Row 2 (Wrong Side): purl 1, knit 1, purl 1, CO 2 stitches, (knit 2, purl 3) 8x, knit 1, purl 1, knit 1, purl 1, knit 1
Work initial 2 rows for 1.5”. Then, work second buttonhole as first.
Work initial 2 rows for 1” more.
Next row: BO 5, work (knit 3, purl 2) rib pattern to end of row.
Divide sts evenly over 3 double-pointed needles (15 sts on each needle). Join and continue working in the (k3, p2) rib pattern for 4 rnds.
See Also:
- Tingle Knit Shrug Free Knitting Pattern
- Knitting Patterns For… (FREE)
- The Ruffled Free Knitting Pattern
Knitting Pattern Begin Thumb Gusset Instructions:
First Rnd: (knit 3, purl 2) 5x, knit 3, increase one stitch by working (purl 1, knit 1) in next stitch, increase one stitch by working (knit 1, purl 1) in next stitch, work rib pattern to end of rnd.
Next Rnd: Work even in rib patttern.
Next Rnd: knit 1, increase one stitch by working (purl 1, knit 1) in next stitch, knit 2, increase one stitch by working (knit 1, purl 1) in next stitch, work to end of round.
Next Rnd: Work even in rib patttern.
Next Rnd: knit 1, increase one stitch by working ( purl 1, knit 1 ) in next stitch, knit 4, increase one stitch by working ( knit 1, purl 1 ) in next stitch, work to end of round.
Continue increasing in this manner at thumb gusset until there are 16 knit stitches of gusset between the purl stitches.
Next Rnd: ( knit 3, purl 2 ) 5x, knit 3, thread the 16 stitches of the gusset onto a scrap piece of yarn and tie loosely (these stitches will be worked later), CO 4 stitches, work in rib pattern to end of round.
Next Rnd: Work even in rib pattern.
Next Rnd: ( knit 3, purl 2) 5x, knit 2, sl 1, knit 1, psso, purl 2, knit 2 together, work in rib pattern to end of rnd.
Work even in pattern until entire piece measures 7.5”.
Next round: ( knit 3, purl 2 together) 9x
Next 3 rounds: ( knit 3, purl 1 ) 9x
BO in rib.
Knitting Left Hand:
Work as for Right Hand, reversing buttonhole and thumb gusset placement.
Buttons:
Follow the instructions on the package for the button maker, if making buttons, or just sew on ready-made buttons.
Finishing the Gusset:
Divide the 16 sts between 3 needles and pull scrap yarn out.
Pick up 2 stitches from CO stitches.
Next round: Knit.
Next round: sl 1, knit 1, psso, knit 2 together, knit to end of round.
Next 2 rounds: ( Knit 3, knit 1) to end of round.
BO in rib.
Sew back flap to front on top of cuff on inside. Weave in yarn ends.


