


This guide provides an overview of crocheting a Rasta hat. It covers what a Rasta hat is, the basics of crocheting, and a step-by-step process for creating a Rasta hat. Additionally, it includes tips and tricks, customization options for Rasta hats, common mistakes to avoid, and resources for finding more information.
Key Takeaways:
- Use a stitch marker to keep track of your stitches and ensure an even pattern.
- Choose a yarn with a medium yarn weight, such as Patons Canadiana, and consider using cotton for a more authentic Rasta look.
- When customizing your hat, try adding a unique touch such as a brim, pom pom, or other embellishment to make it your own.
What is a Rasta Hat?
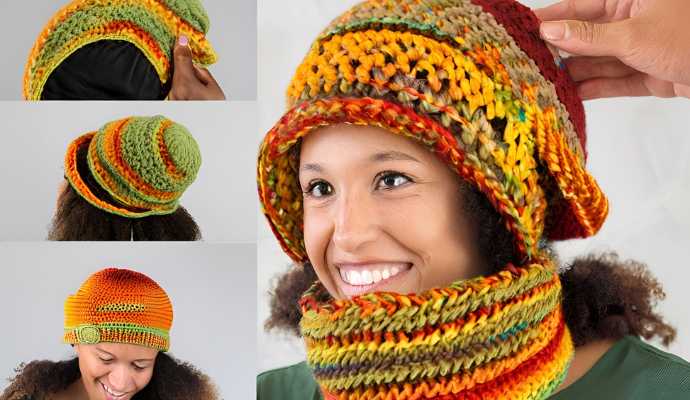
A Rasta hat is a crocheted accessory, typically brightly colored and slouchy, that reflects the style of the Rastafarian movement.
These hats are not only warm during the winter months but also offer a casual look that is perfect for the weekends.
The vibrant patterns often evoke the imagery associated with Bob Marley and Rasta culture, making them popular among individuals of various hair types, including those seeking a solution for a bad hair day, and those looking for a standout piece.
What is Crocheting?
Crocheting is a textile art that involves using yarn to create fabric by interlocking loops with a crochet hook. This versatile and enjoyable craft allows for the production of a wide variety of projects, ranging from simple lace designs to crochet beanies and slouchy hats, including the popular crochet rasta hat.
As a popular hobby, crocheting offers a creative outlet and the rewarding experience of producing beautiful handmade items that can be gifted or worn.
What Materials Do You Need to Crochet a Rasta Hat?
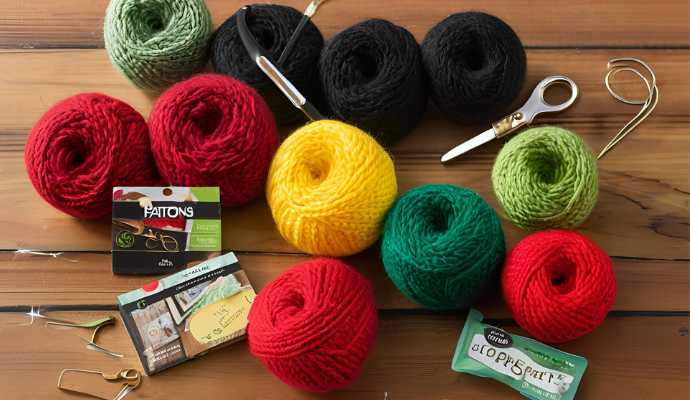
To crochet a Rasta hat, you will need yarn in bright colors, an appropriate crochet hook, and tools for measuring and finishing the project.
Patons Canadiana yarn is often recommended for this project due to its soft, comfortable, and stretchy qualities. A K/6.50mm crochet hook is suggested to achieve the correct gauge measurements.
Additionally, a measuring tape and yarn needle are essential for ensuring accurate stitch counts and for adding neat finishing touches to your crochet rasta hat project.
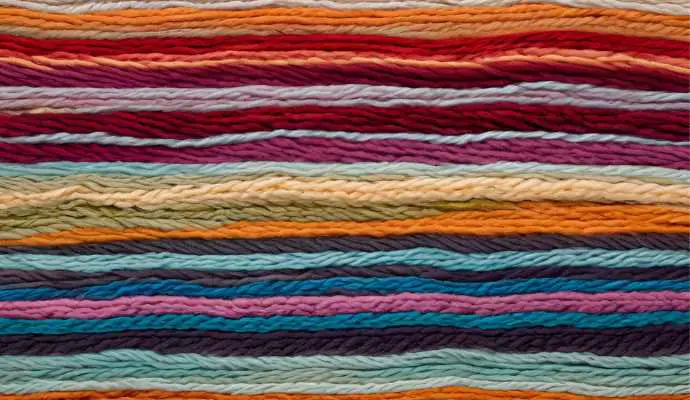
What Type of Yarn is Best for a Rasta Hat?
To crochet a rasta hat, soft and comfortable yarn that strikes the right balance between stretch and warmth is essential. Patons Canadiana is a popular choice for crochet rasta hats due to its extensive range of rasta colors and various yarn weights, accommodating different hat styles.
The vibrant colors of the yarn not only enhance the visual appeal of the finished product but also ensure that the rasta hat is cozy and functional for casual wear or for keeping warm during winter.
Other suitable yarn options include chunky blends such as Bernat Blanket or Lion Brand Wool-Ease, which provide a super-soft texture and a bulkier feel, contributing to insulation and durability. These yarns also come in a wide variety of rich, bold colors that complement the dynamic nature of rasta fashion, allowing for the creation of a unique hat that stands out.
The weight of the yarn significantly affects the drape and overall structure of the finished hat. Heavier yarns create a snugger fit, while lighter materials offer a more relaxed appearance. Ultimately, the choice of yarn influences not only the aesthetic design but also the overall comfort and functionality of the rasta hat, allowing for a range of styles to suit various personal preferences.
What Size Crochet Hook Should You Use?
The size of the crochet hook you choose can significantly affect the appearance and fit of your rasta hat. For most patterns, a K/6.50mm crochet hook is recommended. This size allows for accurate gauge measurements, ensuring the correct stitch count necessary to achieve the desired dimensions for various women’s sizes, whether small size or large size.
Selecting the right crochet hook will help you create a warm, stylish hat that fits comfortably and looks great.
It’s also important to consider the thickness of the yarn, as the crochet hook size should correspond to the yarn’s thickness. Generally, thicker yarn requires a larger hook, while finer yarns need a smaller hook for a tight and polished finish.
Before starting your final project, you should check your gauge to confirm you are using the correct hook size. Crocheting a small test swatch will enable you to measure stitches per inch easily and adjust your hook size if your stitch count deviates from the pattern’s recommendations.
By paying attention to these details, you can ensure that your hat not only fits perfectly but also showcases your crochet skills beautifully, transforming a simple project into a piece of crochet fashion that is both stylish and functional.
What Other Materials Do You Need?
Along with yarn and a crochet hook, there are several other materials that can assist you in crocheting a rasta hat:
- Measuring Tape: This is essential for measuring the head circumference of the wearer to ensure a snug fit, especially when making crochet rasta hats in different women’s sizes.
- Yarn Needle: A yarn needle is useful for weaving in ends and finishing the project neatly.
- Scissors: You will need scissors for cutting yarn precisely.
- Clear Crochet Instructions: Having clear crochet instructions and understanding crochet abbreviations will guide you through the crocheting process effectively.
- Stitch Markers: These are helpful for marking specific stitches or rows, serving as reference points to prevent forgetting pattern repeats and having to unravel your work.
- Comfortable Workspace: A well-lit area will help you see your stitches more clearly, and a comfortable chair will allow you to focus on your crocheting.
- Organized Workspace: A tidy and distraction-free workspace can significantly enhance your crocheting success.
- Yarn Type: The type of yarn you select impacts the texture and drape of your rasta hat, whether you choose bright colors for a fun funky look or soft comfortable fibers for a cozy fit.
- Project Bag: A dedicated project bag can help keep all your crocheting materials organized and easily accessible during each session.
How to Crochet a Rasta Hat?
Crocheting a rasta hat is a simple project that involves using a crochet pattern along with a few basic crochet techniques.
Techniques such as creating a magic circle, performing double crochet, and using the mesh stitch can all be applied while making a rasta hat. When combined with textured stitches, these techniques enhance the style and character of the design.
This guide includes a video tutorial aimed at beginner crocheters, teaching them the essentials needed to create colorful, functional, and unique rasta hat patterns that reflect their individual abilities and creativity. By following pattern instructions and learning crochet techniques, you can achieve a stylish hat perfect for any casual weekend or warm winter day.
Step 1: Make a Slip Knot
The first step in crocheting a rasta hat is to create a slip knot. A slip knot is an easy make for any crocheting project, as it holds the yarn in place while allowing for adjustments in tension as you work. This knot serves as the foundation for forming a magic circle, which is the preferred starting point for the rasta hat because it establishes a tight beginning that will shape the rounded top of your creation.
To make a slip knot, create a loop with your yarn and pull a strand through the loop. While the process is simple, its significance lies in providing a secure starting point that can support the tension of the numerous stitches that will follow. A slip knot ensures that your crocheting project maintains the necessary tension for durability and appearance in the finished piece.
This technique is commonly taught in beginner crocheting guides and is widely regarded as the best method to initiate any crocheted project. For a visual demonstration, you can refer to the YouTube video linked below, which thoroughly walks you through the steps to create a slip knot. This technique is well-documented across many instructional sites, making it accessible for anyone looking to learn.
Step 2: Chain Stitch
The chain stitch is the second step in crocheting a rasta hat, following the slip knot. This chain stitch forms the foundation upon which future stitches will be added.
Begin by holding the slip knot with your crochet hook, then yarn over by wrapping the yarn from the skein over the hook. Next, pull the yarn through the loop on your hook. Repeat this step as many times as necessary to create the base for your project.
The tightness of your chain stitches and the amount of slack between them are crucial, as they will serve as the foundation for all subsequent stitches. If the chain stitches are spaced too far apart or are too tight, the overall structure of the hat will be compromised.
It is important to pay attention to how tightly you hold the yarn; too much tension will make the starting point too tight and rigid, while too little tension will result in gaps between the stitches, affecting the hat’s overall shape.
Experimenting with the thickness of your yarn and the size of your crochet hook can help you achieve the desired effect. For those who are uncertain about how to crochet a rasta hat, following detailed crochet instructions or watching video tutorials is an excellent way to better understand the process and enhance the enjoyment of your project.
Step 3: Single Crochet
The single crochet stitch comes after completing your chain stitch and is one of the most fundamental crochet stitches. It will enhance the density and texture of your rasta hat.
To create a single crochet, insert your hook into the second chain from the hook. Yarn over and pull through the chain, resulting in two loops on your hook. Yarn over again and pull through both loops. Repeat this process as many times as necessary to achieve your desired number of stitches.
When working on the single crochet stitch, it’s essential to maintain even tension to ensure your hat has a uniform appearance. If your stitches are too tight, consider using a larger hook or loosening your grip on the yarn. Conversely, if your stitches are too loose, adjust your technique to create more consistent tension.
Single crochets will also define the edges of your rasta hat, so be mindful of the evenness of the shape and the overall finished look.
If you make a mistake, such as skipping a stitch or creating an uneven row, simply unravel back to that point and continue from there.
Step 4: Double Crochet
After mastering single crochet stitches, the next step in creating your rasta hat is to add double crochet stitches, which will provide height and a distinctive textured stitch.
This crucial addition not only enhances visual interest but also adds a dimensional quality, making the overall aesthetic more dynamic.
As you progress through the pattern, it is essential to maintain consistent tension to ensure that each double crochet is even. The height gained from the double crochet contributes to the hat’s structure, allowing it to fit snugly while retaining its shape.
Additionally, the spaces created between the stitches offer opportunities for creativity, serving as perfect spots to incorporate color or embellishments that enhance the unique personality of your rasta hat.
Step 5: Half Double Crochet
A half double crochet stitch is essential in creating a crochet rasta hat. This stitch combines features of both single and double crochet. To execute a half double crochet, yarn over, insert the hook into the next stitch, yarn over again, and pull through, leaving you with three loops on the hook.
Then, yarn over once more and pull through all three loops.
The half double crochet stitch produces a unique stitch pattern that enhances the design of any crochet piece. It adds a lovely texture that stands out, creating a soft and cozy feel that is ideal for headwear. Maintaining even tension while performing half double crochet is important to ensure consistent stitch size.
Aim to apply the same amount of force for each stitch, keep your fingers steady, and consider using a stitch marker to track your progress.
Along with its functionality, the half double crochet stitch contributes to the volume and structure of the hat, making it both practical and visually appealing. Don’t hesitate to experiment with different yarns to observe how they can affect the final outcome.
Step 6: Slip Stitch
The final step in crocheting your rasta hat is the slip stitch, which allows you to join the round and achieve a clean finish. To execute a slip stitch, insert your hook into the last stitch of the previous row, yarn over, and pull through both the stitch and the loop on your hook.
This secures your work and prepares it for the finishing touches that will enhance your hat. The slip stitch is a fundamental stitch that not only provides a polished appearance but also reinforces the structure of the hat, preventing it from unraveling.
After completing this step, you can elevate your project by exploring crochet finishing techniques, such as adding borders or incorporating different patterns to enhance the overall look. Additionally, by experimenting with various crochet stitches and styles, crafters can personalize their hats significantly.
What are Some Tips for Crocheting a Rasta Hat?
Here are several tips that can help you successfully crochet a rasta hat.
Utilizing tools like a stitch marker can aid in tracking your progress and maintaining even tension throughout your work.
Additionally, paying attention to the weight of your yarn and using the appropriate size hook will significantly influence the overall appearance and fit of your finished crochet piece.
Tip 1: Use a Stitch Marker
A stitch marker is a valuable tool in crocheting that helps you keep track of your starting point and indicates where you need to increase or decrease stitches in your rasta hat.
It is placed at the beginning of each round to ensure you do not lose count and know your next steps. By helping you maintain an accurate stitch count, a stitch marker simplifies the crocheting process and enhances the overall structure of your project.
Tip 2: Keep Your Tension Consistent
Maintaining consistent tension while crocheting is crucial for ensuring an even stitch count and achieving a finished rasta hat without any irregularities. Inconsistent tension can lead to uneven stitches, which can negatively affect the structural integrity of the hat. With practice and a steady hand, you can achieve consistent tension, resulting in uniform stitches and a more polished outcome.
One effective way to improve tension control is by using the right combination of hooks and yarn. Switching to a hook that fits comfortably in your hand can enhance your ability to manage your grip and yarn tension effectively.
Crocheters often find that rhythm and pace are essential components of the craft. Discovering your own crocheting flow can help you maintain consistent tension in every stitch while also reducing fatigue.
Regularly checking your tension as you work will enable you to make adjustments when it becomes too loose or tight, ultimately leading to a more uniform and aesthetically pleasing rasta hat that reflects the crocheter’s skill and dedication.
Tip 3: Use the Right Size Hook
Choosing the correct hook size for a crochet rasta hat is crucial for achieving the right gauge measurements, which will, in turn, affect the fit and overall appearance of the project. A hook that is too small will create a tighter weave, while a hook that is too large may produce loose stitches that can alter the hat’s shape.
When starting a crochet project, it is essential for crocheters to consider how the hook size influences the yarn’s tension and drape. To determine the best gauge, it is common for individuals to create a swatch using a hook and yarn combination they believe will work well together.
This simple step can help prevent issues later on, ensuring that the finished piece not only fits properly but also looks as intended. Yarn labels can assist in this decision, as they often recommend appropriate hook sizes for the yarn.
Achieving the proper gauge is vital not just for the appearance and drape of the finished piece, but also for the durability and comfort of the final product.
How to Customize Your Rasta Hat?
Customizing your rasta hat enables you to add a personal touch to your crochet project, making it a truly unique piece of fashion.
Whether you choose to add a stylish brim for extra flair, a fun pom pom on top, or floral embellishments to enhance its aesthetic, the customization options are virtually limitless.
This allows you the freedom to express your creativity in a way that reflects your individual style.
Adding a Brim
A brim is an effective way to customize rasta hats while also adding a functional element that protects the wearer’s face from the sun. Brims can be created by crocheting additional rows of stitches along the circumference of the hat or by using a separate piece of fabric that is sewn onto the hat. This method not only enhances the hat’s design but also provides a practical feature.
To begin the process, select the right materials, choosing a yarn that complements the vibrant colors typical of rasta designs. The next step is to measure the circumference of the opening of the rasta hat, as this measurement will help you determine the appropriate width for your brim if you are crocheting it.
- Start by chaining the desired length and then work in the round, ensuring you maintain even tension and use stitch markers to keep track of your rows.
- Alternatively, you can create a brim using fabric. If you opt for this method, cut a piece of fabric to the appropriate size and pin it in place.
- Be sure to sew the fabric neatly and securely to prevent the brim from coming loose.
Adding a Pom Pom
Adding a pom pom to your rasta hat can be a fun and decorative touch. A pom pom is a small ball made of soft material, often yarn, that is attached to clothing and accessories for embellishment.
You can create a pom pom using a pom pom maker, or by wrapping yarn around your fingers, cutting the strands, and tying them in the center to hold their shape. Once formed, the pom pom can be sewn onto the top of the hat using a yarn needle.
Using multiple colors of yarn to make a vibrant pom pom that reflects the rasta colors will enhance its visual appeal. You can also vary the size of the pom pom to suit the overall aesthetic of the hat; a larger pom pom will make a bold statement, while a smaller one can add a subtle touch of character.
Ensuring that the pom pom is sewn securely will prevent it from falling off as you wear your unique rasta hat. Don’t hesitate to experiment with different textures of yarn for an even more distinctive effect.
Adding a Flower or Other Embellishments
Enhancing your rasta hat with flowers or other embellishments is an easy way to infuse beauty and personality into your crochet project. You can either crochet flowers separately using simple lace patterns or purchase decorative appliqués to sew onto the rasta hat. In either case, these additions will elevate the uniqueness of your hat.
Consider incorporating beads or feathers for a bohemian vibe, or even small charms that hold special significance for you. If you prefer to create your own embellishments, select complementary colors to match your rasta hat and search online for various flower crochet patterns.
Attaching them is simple; you can either sew them on or use a hot glue gun. This way, each embellishment will not only enhance the hat’s visual appeal but also reflect your unique style and preferences. Consider adding beads or tassels for a fun funky touch!
Common Mistakes to Avoid When Crocheting a Rasta Hat
Common mistakes when crocheting a rasta hat include using the wrong type of yarn, failing to maintain an accurate stitch count, having inconsistent tension, neglecting to check gauge measurements, and not considering the yarn weight. These errors can significantly affect the finished sizes and overall look of the hat.
By recognizing these common errors, you can enhance your crocheting skills and create a rasta hat that meets your expectations, whether you aim for a slouchy hat, a crochet beanie, or another style.
Mistake 1: Using the Wrong Yarn
The most common mistakes when crocheting a rasta hat include choosing the wrong yarn and creating an ill-fitting or poorly textured hat. It is essential to select a yarn with a fiber content that aligns with the recommended yarn weight of the pattern; using a heavier or lighter yarn can significantly alter the look and feel of the finished product.
The fiber content is also crucial for the comfort and durability of the final piece. Natural fibers like wool or cotton offer breathability, while acrylic blends enhance durability, making them more suitable for everyday use. Using soft comfortable yarn ensures that the hat will be a pleasure to wear.
Additionally, the twist and ply of the yarn can affect the drape and stretch of the final hat, influencing how well it fits on the wearer’s head. A stretchy hat is often more comfortable and can accommodate different hair types and head sizes.
When choosing yarn, it is important to consider the climate and intended use of the rasta hat to ensure that all choices work together to create a fitting and warm accessory. For a casual weekend or a warm winter outing, selecting the right yarn can make all the difference in your finished product.
Mistake 2: Not Counting Stitches
Failing to count your stitches while crocheting can result in uneven sizing and an inconsistent appearance in your rasta hat. It is advisable to count your stitches, especially when following a pattern, to ensure that the shape and size of the hat remain consistent throughout your work. This can be particularly important when working with colorful yarn to maintain a coherent pattern.
Consistency not only enhances the visual appeal of the hat but also impacts its overall functionality and correct fit. One effective way to improve your precision is by using stitch markers; placing them at the beginning of each round makes it easy to check and track your progress in the project.
Additionally, maintaining a notebook or using an app on your phone to record your stitch counts can help organize your work and reduce mistakes. Regularly checking your count against the pattern allows you to identify any discrepancies in real-time, resulting in a finished product that looks more professional.
Mistake 3: Not Keeping Tension Consistent
Inconsistent tension while crocheting can result in a poorly shaped rasta hat, with some areas being too loose while others are too tight.
To achieve a fabric that is even, fits well, and appears professional, it is essential to maintain consistent tension throughout the project.
Mistake 4: Not Checking Gauge and Head Circumference
One of the most common mistakes when crocheting a rasta hat is failing to check gauge measurements and head circumference, which can result in an incorrect fit. Gauge is a crucial aspect of any crochet project, including rasta hats, as it ensures that your work aligns with the specifications of the pattern and achieves the intended size and style. Measuring tape can be very helpful in this process.
To check gauge, it is essential to create a small sample swatch that measures at least 4 inches by 4 inches, incorporating several rows and stitches using the yarn and hook specified in the pattern. After completing the swatch, measure the number of stitches and rows per inch.
If your gauge differs from the pattern, you will need to adjust your hook size or yarn accordingly. Using a larger hook will create a looser stitch, while a smaller hook will produce a tighter fabric.
By properly assessing and adjusting the gauge before starting the bulk of your work, you can ensure that the final fit of your rasta hat meets your expectations, avoiding unsightly or unwearable finishing touches. This is essential for creating stylish hats that are both functional and visually appealing.
Frequently Asked Questions about Crochet Patterns and Techniques
What is a Rasta Hat Crochet Pattern and Its Skill Level?
A Rasta Hat Crochet Pattern is a set of instructions for creating a crocheted hat with Rastafarian-inspired colors and designs. It typically includes a list of materials, step-by-step instructions, and a photo or diagram of the finished product. The skill level required can vary, but most patterns are suitable for intermediate crocheters.
What materials do I need to make a Rasta Hat Crochet Pattern?
To make a Rasta Hat Crochet Pattern, you will need a crochet hook, yarn in the colors of red, green, yellow, and black, and a yarn needle. You may also want to use a stitch marker, measuring tape, and scissors. Using crochet abbreviations can be helpful during the process.
Do I need to know how to crochet to make a Rasta Hat Crochet Pattern?
Yes, you will need basic crochet skills to complete a Rasta Hat Crochet Pattern. This includes knowing how to make single crochet, double crochet, and slip stitches. If you are new to crochet, it may be helpful to learn these stitches before attempting the pattern.
Can I customize the Rasta Hat Crochet Pattern?
Absolutely! One of the great things about crochet is that you can easily customize patterns to make them your own. You can choose different yarn colors or add embellishments like beads or tassels to make your Rasta Hat unique. Adding a simple lace or an open stitch can also give your hat a nice layer of detail.
Where can I find a Rasta Hat Crochet Pattern and Video Tutorial?
You can find Rasta Hat Crochet Patterns online through various websites and blogs, as well as in crochet pattern books. You can also create your own pattern by drawing inspiration from Rastafarian culture and incorporating it into a basic hat pattern. Many websites also offer video tutorials to guide you through the process.
What skill level is required for a Rasta Hat Crochet Pattern?
Most Rasta Hat Crochet Patterns are suitable for intermediate crocheters. However, with patience and practice, beginners can also complete the pattern successfully. It is important to read through the instructions carefully and take your time with each step to ensure a well-made hat. Familiarizing yourself with crochet techniques and crochet abbreviations can be very helpful.
