


This guide will take you through the process of creating your very own Jack Skellington crochet doll. You will start by gathering essential materials such as yarn, stuffing, and a stitch marker, and then follow step-by-step instructions to craft his head, body, and limbs. Everything you need to bring this iconic Pumpkin King to life is included. Additionally, you will find tips on color changes and stuffing techniques, as well as creative ideas for using your finished doll as a toy, decoration, or thoughtful gift. So grab your crochet hooks, and let’s get started!
Key Takeaways:
- Gather all necessary materials before starting the project, including yarn, crochet hook, stuffing, scissors, and yarn needle.
- Follow the step-by-step instructions carefully to create the head, body, arms, legs, and face of the Jack Skellington crochet doll.
- Use various tips and tricks, such as changing colors and stuffing techniques, to enhance the appearance of the doll.
What Materials Do You Need?
To create adorable crocheted wreaths for Halloween decorations, you’ll need specific materials to ensure your cozy crafts are completed correctly. Along with selecting a fun Halloween-themed design, here are the essential materials required for making Halloween-themed crocheted wreaths:
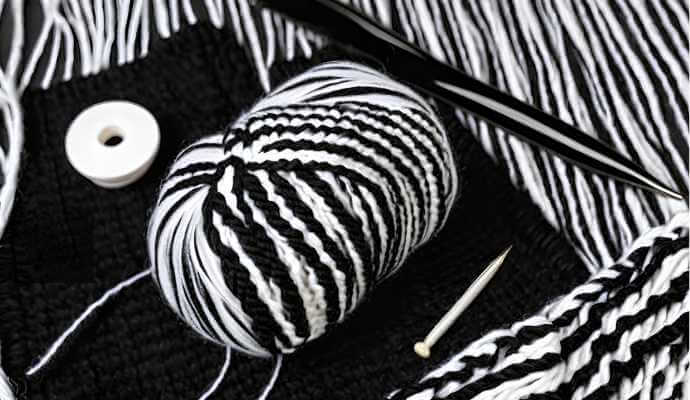
- Yarn: Choose from a variety of yarn types. Black and white yarn creates a spooky yet stylish contrast, while yarn in the colors of autumn leaves or trick-or-treat bags can add a festive touch.
- Crochet Hook: A quality crochet hook is essential. It facilitates the hand movements necessary for crochet techniques, including the magic ring, single crochet, decrease, increase, and slip stitch.
- Stuffing: Stuffing is important for creating the shape of your crocheted wreaths and giving them a plump appearance. Polyfill is a popular choice due to its light and soft texture.
- Scissors: Scissors are needed for cutting the yarn at the end of each crochet stitch, ensuring clean finishes.
- Tapestry Needle: Tapestry needles, which feature a large, blunt tip, are vital for weaving in ends and sewing various pieces together.
1. Yarn
When creating your crocheted wreaths for Halloween, one of the most important factors to consider is the yarn you choose. The weight and color of the yarn can significantly impact the appearance of your finished wreath.
Yarn weight, which ranges from lace to bulky, affects the overall look; lighter weight yarns create delicate details, while heavier options add bulk and warmth. Additionally, your color choices play a crucial role. Classic black and white yarns evoke the quintessential Halloween aesthetic, reminiscent of ghosts and shadows.
2. Crochet Hook
“`html
Selecting the right crochet hook is one of the most important aspects of your crafting supplies, as it directly affects your crochet ability and the ease with which you can stitch. Using the appropriate type and size of hook can enhance your creative potential. For a fun project, check out the Jack Skellington Crochet Doll Pattern Free.
Familiarizing yourself with the different types of crochet hooks available—such as ergonomic, metal, bamboo, and plastic—can significantly improve your overall crafting experience. Each type offers unique benefits; for instance, metal hooks slide more easily through the yarn, while bamboo hooks provide a warmer feel and better grip.
It is especially crucial to choose the right size of hook for the weight of the yarn being used, as the yarn size influences the size of the stitches. Using the appropriate hook size for the yarn weight allows you to create evenly sized stitches, which not only enhances the aesthetic appeal of the final product but also affects its drape and durability.
By carefully considering the types and sizes of crochet hooks, you can improve your overall crochet techniques, ultimately leading to better and more satisfying projects. This is key to mastering more complex patterns, such as those found in the crochet community.
3. Stuffing
Stuffing plays a crucial role in plush, three-dimensional projects like amigurumi, as it helps provide shape and comfort to crocheted wreaths. Effective stuffing techniques can greatly enhance the aesthetic appeal of your amigurumi creations.
Many crafters opt for Polyfill, a light and soft material suitable for a variety of stuffed creations. However, other stuffing options, such as cotton, wool, and even upcycled fabric scraps, can also be used.
To ensure that amigurumi is properly stuffed, it’s important to use effective stuffing techniques. For instance, a chopstick or a similar tool can be helpful for pushing stuffing into tight areas and ensuring it is distributed evenly without lumps.
This meticulous approach not only enhances the aesthetic appeal of the finished project but also contributes to a more fluid and creative crafting experience with each stitch.
4. Scissors
Scissors are an essential crafting supply, as a good pair is crucial for completing your crocheted wreaths with clean cuts and precise trimming. This is especially important when you need to sew closed the ends of your projects.
Beyond wreath-making, quality scissors are important for various crafting projects, from snipping fabric for sewing to shaping embellishments with accuracy.
For example, when sewing closed pieces, sharp and well-balanced scissors ensure that the edges are neat and free from fraying, which is particularly important for Halloween decorations.
A polished finish enhances the overall aesthetics of your crafts and reflects your dedication to detail and quality.
Therefore, as you assemble your crafting tools, remember that investing in a good pair of scissors will significantly enhance both your crafting experience and the final results.
5. Yarn Needle
A yarn needle is an essential tool for finishing your crocheted projects. It is used for assembling different parts and applying the final touches that give your Halloween wreaths a professional appearance.
With a yarn needle, you can easily weave in the ends of the yarn to conceal them, enhancing both the aesthetic appeal and functionality of your crocheted piece. By threading the needle with leftover yarn, you can tuck it into the back of your work, preventing fraying or unraveling. This technique not only helps hold the pieces together but also allows for the creation of decorative patterns, such as spooky accents or vibrant motifs, which are especially useful for festive decor.
Having the right crafting supplies on hand, such as scissors and stitch markers, can simplify the process of piecing together various elements into a cohesive whole, ensuring that every project stands out during the Halloween season.
Step-by-Step Instructions
A Jack Skellington-inspired crocheted wreath is a delightful project that will enhance your Halloween decor. Follow these step-by-step instructions to create a whimsical amigurumi-style wreath featuring Jack Skellington. This is an excellent example of cozy crafts that can be both fun and festive.
Materials Needed:
- Multipurpose yarn in black, white, grey, and a pop of color of your choice (for the bow). Black yarn and white yarn are essential for capturing the spooky yet stylish contrast of Jack Skellington.
- A plastic or wire wreath frame in your preferred size (recommended diameter: 12 inches or larger)
- Hot glue gun and glue
- Crafting scissors
Instructions:
- Create the Parts of the Wreath: Use multipurpose yarn in black, white, grey, and your chosen accent color, along with stuffing materials (such as polyester fiberfill or cotton balls), to craft the components of the wreath according to the amigurumi Jack Skellington pattern. The dimensions for each part are as follows:
- Head: 9.2 cm (3.6 inches)
- Body: 6.75 cm (2.65 inches)
- Arms: 5.1 cm (2 inches)
- Legs: 3.25 cm (1.25 inches)
- Assemble the Wreath: Cut the yarn into appropriate lengths—12 to 24 inches (30.48 to 61 cm) for the arms, legs, and bow, and 25 to 30 cm for the top bow. Wrap the yarn around the plastic or wire wreath frame, securing each piece by knotting it at the back.
- Attach the Parts: Use a hot glue gun to affix the various parts of Jack Skellington onto the wreath. You can either follow your own design or draw inspiration from the Jack Skellington crocheted wreath.
- Add Finishing Touches: Cut the yarn for the arms and legs to your desired length and style to complete the look.
Source: Amigurumi Jack Skellington Pattern.
1. Head
The head of the wreath will be crafted using black yarn for the base and white yarn for Jack Skellington’s iconic features. To create the adorably creepy Jack Skellington wreath pattern, choose a yarn weight for your project and stick with it throughout. A worsted weight yarn works well for a medium-sized project. You will need black yarn for the head base, white yarn for Jack’s features, light pink yarn for the skin (optional), black safety eyes (optional), scissors, a yarn needle, fillers (optional), and stitch markers (optional).
Begin by using the black yarn to make a magic circle. Then, follow these steps:
1. Chain 2 stitches (counts as first double crochet), 11 double crochet in the magic ring, slip stitch to top of chain-2 to join. (12 stitches)
2. Chain 2, double crochet in next stitch, double crochet in each stitch around, slip stitch to top of chain-2 to join. (24 stitches)
- Round 1: Make 6 single crochets (sc) into the circle (6 sc).
- Round 2: Make 2 sc in each sc around (12 sc).
- Round 3: Make 1 sc in the first sc, then 2 sc in the next sc around (18 sc).
- Round 4: Make 1 sc in the first two sc, then 2 sc in the next sc around (24 sc).
- Round 5: Make 1 sc in the first three sc, then 2 sc in the next sc around (30 sc).
- Round 6: Make 1 sc in the first four sc, then 2 sc in the next sc around (36 sc).
- Round 7: Make 1 sc in the first five sc, then 2 sc in the next sc around (42 sc).
- Round 8: Make 1 sc in the first six sc, then 2 sc in the next sc around (48 sc).
- Round 9: Make 1 sc in the next six sc, then 1 sc in the next sc (repeat until the desired height).
(Optional rounds for height variation): These rounds allow for creative projects and can be adjusted according to your desired pattern design.
- Round 10: Make 1 sc in the next seven sc, then 1 sc in the next sc (repeat until the desired height).
- Round 11: Make 1 sc in the next eight sc, then 1 sc in the next sc (repeat until the desired height).
- Round 12: Make 1 sc in the next nine sc, then 1 sc in the next sc (repeat until the desired height).
- Continue this pattern, increasing the number of single crochets until you reach Round 31.
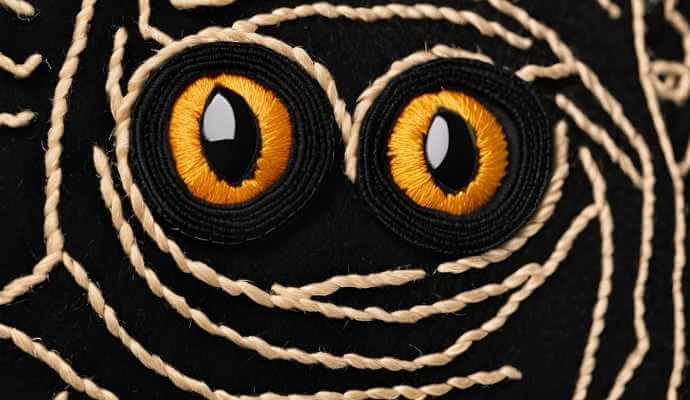
After reaching the desired height, cut the yarn, leaving a long tail for sewing. Use your crochet hook to create Jack’s eyes and mouth. Switch to white yarn, crafting the eyes with cute creations, and carefully snip the black threads for the mouth.
- Round 22: For the mouth, sew on a long, thin triangle of black yarn with an indented end (like a V). For the eyes, sew on two small black ovals.
To achieve the classic Jack Skellington look, utilize a slip stitch instead of a single crochet. With the white yarn, chain three and turn, ensuring your cozy crafts maintain the festive decorations synonymous with the Pumpkin King.
- Round 23: For the nose, sew on a small black triangle with a base of about 1 inch. Sew on two small black eyebrows for added expression.
- Round 24: For the mouth, sew on two small white ovals. For the chin, sew on a large triangle with a base of about 1 inch, and for the cheeks, sew on small triangles with bases of about 1 inch.
Repeat this process in the following rounds, alternating between black and white yarn for the mouth, chin, and cheeks, as described in the previous rounds. After completing Round 31, you will have a delightful Jack Skellington wreath ready to display!
2. Body Assembly
Next, we will create the body assembly using crochet techniques that form continuous spirals. This assembly provides a stable foundation for the wreath and is made by building a series of stitches upon one another, resulting in a structured and durable base.
As you follow the crochet pattern instructions, it is essential to use stitch markers to indicate the beginning of each round. This practice will help prevent the body assembly from becoming misaligned, which could lead to an uneven structure.
Additionally, it is important to employ single crochet, increase, and decrease techniques in a rhythmic manner. This approach will enhance the texture of the body assembly and ensure consistent tension throughout your work, resulting in a well-rounded finish that is both strong and durable.
3. Crochet Arms
The arms of your wreath can be a delightful feature, allowing you to incorporate increase and decrease crochet techniques for dynamic shapes that invite creative embellishments.
A great way to begin is by using a magic ring for the base with your crochet hook, and incorporating single crochet stitches for the lower part of the arms while working in rounds.
To introduce a sense of motion, consider using a bobble stitch or puff stitch for the upper part, as this will create a fuller, more animated appearance.
Additionally, incorporating a color change with a slip stitch can add character to the arms, making them festive decorations for the spooky month of Halloween.
To top it off, a fun fringe made from chain stitches can provide a charming finishing touch, ensuring that the arms are not only functional but also a playful aspect of your crochet wreath.
4. Legs
The legs are a delightful addition to the amigurumi-style wreath, contributing decorative patterns that enhance its overall appearance while also providing balance and support.
Shaping the legs involves a series of single crochet stitches, along with practicing increases and decreases to achieve a natural tapering effect. Be sure to stuff them lightly as you work on each section to create a pleasing rounded shape.
Once both legs are completed, securely attach them to the body, ensuring they are placed evenly to maintain the decorative aspect.
Experimenting with different colors or textured yarns can add extra layers of detail, further enhancing the overall aesthetic of the project.
5. Head Assembly
The face assembly is the stage where your wreath transforms into a true tribute to Jack Skellington, as you incorporate unique features that capture his playful yet spooky personality. This step is crucial because it adds character to your wreath and enhances its recognizability.
Carefully select crochet patterns for the eyes, nose, and mouth using black yarn and white yarn that effectively evoke their spooky yet playful qualities. You may also consider adding small embellishments, such as buttons or beads, to these features, enhancing them with DIY accessories.
The placement of these elements is important; the angle and spacing can significantly alter the overall expression of your wreath. Feel free to experiment with different textures and colors that best embody the whimsical yet eerie nature of the character.
Tips and Tricks
Tips and tricks to enhance your crocheting experience can significantly improve your Halloween crafts, making the projects easier and more enjoyable.
Understanding the best techniques for changing colors can add dimension to your wreaths, while learning how to stuff amigurumi properly will give your projects a more professional appearance.
1. Changing Colors
Changing colors in crochet can be a challenging skill for beginners, but once mastered, it opens up a world of creativity and crafting enjoyment in your projects.
With the right approach, color changes become a straightforward part of the crocheting process. To ensure a seamless transition between colors, it’s essential to use effective techniques, such as the slip knot or the join-as-you-go method, which help maintain even tension and prevent gaps.
Practicing color changes at the end of a row is beneficial for achieving the necessary consistency. Combining bright colors with pastel shades can enhance the appearance of items like blankets or scarves. Additionally, paying attention to color placement according to the pattern can yield stunning visuals.
Finally, remember to weave in your ends properly to avoid unraveling.
2. Stuffing Techniques
Proper stuffing techniques are crucial for the appearance, durability, and shape of an amigurumi project. Ensuring that your crocheted items are both visually appealing and structurally sound is essential for every crafter.
One popular technique involves using Polyfill, a synthetic fiber that provides a plush and soft feel. When using Polyfill, it is important to apply small amounts at a time, gently pushing it into the areas you wish to fill for even distribution.
Taking a moment to shape and mold the stuffing as you work can effectively prevent lumps or uneven sections in the finished product. If you notice specific areas that feel overly soft or flat, don’t hesitate to add more fiber to achieve the desired consistency.
Conversely, if you encounter stuffing that is too hard or uneven, removing the fiber and restuffing is often the best approach to achieve optimal results.
How to Use the Jack Skellington Crochet Doll
Your Jack Skellington crochet doll can serve multiple purposes: it can be used as a toy, a decoration, or a thoughtful gift.
Each of these options showcases the versatility of your craftsmanship and highlights the personalized touch that seasonal crafts are celebrated for.
1. As an Amigurumi Style Toy
The Jack Skellington crochet doll is a safe toy for children to enjoy during Halloween and throughout the year. This amigurumi toy provides a soft and tactile experience that is perfect for little hands, ensuring hours of imaginative play.
Unlike many plastic toys, amigurumi toys are made from non-toxic materials. The unique design encourages creativity, allowing children to invent their own adventures and stories featuring their favorite characters, such as Disney’s beloved Jack Skellington.
Additionally, the durable construction of this doll enables it to withstand rough play, promoting sensory development. A crocheted toy not only enhances playtime by providing enjoyment but also offers safety and valuable learning opportunities.
2. As Halloween Decor
Incorporating your crochet doll as a decorative piece can elevate your home’s Halloween decor by adding a touch of fun and artistry to the holiday atmosphere.
When placed strategically alongside other seasonal decorations, such as pumpkins and cobwebs, the doll can help create an inviting yet eerie vibe. Displaying the crochet doll on a shelf or mantel surrounded by candles and autumn leaves will draw attention to it and spark conversations among your guests.
Adding a small cape or other matching DIY accessories to the doll can enhance the holiday spirit and transform an otherwise unused space into a cozy corner filled with Halloween charm, celebrating the Pumpkin King in all his glory.
When paired with other handmade pieces, the crochet doll can serve as a focal point in your overall decorative scheme.
3. As a Gift
A Jack Skellington crochet doll can make a wonderful gift for several reasons.
- Sharing Love for Crochet and Halloween: Gifting a crochet item, such as a Jack Skellington doll, is a thoughtful way to express your passion for both crochet and Halloween. It allows you to share the joy of the spooky month with your loved ones, especially those who appreciate the craft, Halloween-themed decor, or the holiday.
- Material and Personal Touch: When you create a crochet gift, the recipient not only enjoys the item itself but also understands the meaning behind it. They can feel the warmth of the yarn and the love woven into every stitch. Additionally, crochet items designed for Halloween can be easily customized in terms of color, pattern design, and decorative patterns or tailored to represent a person’s favorite character or theme, adding a personal touch.
- Reminiscing Shared Memories: Unique crochet gifts elevate the act of giving beyond mere materialism. They serve as tokens of your care and thoughtfulness, evoking memories of shared experiences whenever the recipient uses or sees the item. These memories could be linked to special holidays, Disney characters, or inside jokes.
- Personal Connection: The ability to customize crochet gifts makes them unique and meaningful. You can adjust the colors, like black yarn and white yarn, to complement the recipient’s home decor and incorporate their favorite yarns, scents, and embellishments. For instance, you might include scented sachets for a child or design the doll with features resembling the ears of their favorite cartoon character for a pet.
Frequently Asked Questions
What is a Jack Skellington crochet doll pattern?
A Jack Skellington crochet doll pattern is a set of instructions that allows you to create a doll of the popular character from “The Nightmare Before Christmas” using the amigurumi style and various crochet techniques such as single crochet and slip stitches.
Where can I find a free Jack Skellington crochet doll pattern?
You can find a free Jack Skellington crochet doll pattern online through various crafting websites, blogs, and social media platforms. A simple Google search for “Jack Skellington crochet doll pattern free” will bring up many options, offering cozy crafts and DIY accessories ideas.
Do I need to have advanced crochet skills to make a Jack Skellington doll?
While having some basic crochet skills may be helpful, most free Jack Skellington crochet doll patterns are designed for beginners. The easy patterns typically include step-by-step instructions and photos to guide you through the process, making it a fun project for all skill levels.
What materials do I need to make a Jack Skellington crochet doll?
The materials needed for a Jack Skellington crochet doll typically include yarn in black and white, a crochet hook, stuffing, and a tapestry needle. Additional crafting supplies like a stitch marker, magic ring, and polyfill may also be required. Some patterns may call for felt for details or safety eyes.
Can I sell Jack Skellington dolls made from a free crochet pattern?
It is important to check the terms of the specific pattern you are using, as some may have restrictions on selling items made from the pattern. However, many free Jack Skellington crochet doll patterns allow for items made from the pattern to be sold as long as credit is given to the original designer. Pattern sharing in the crochet community is a great way to support pattern designers.
Are there any tips for making a Jack Skellington crochet doll?
Some helpful tips for making a Jack Skellington crochet doll include using a smaller crochet hook to achieve a tighter stitch for a more detailed look, using black felt for the eyes and mouth instead of white to make them stand out more, and using a contrasting color for the stitches on the head to make the face more defined. Additionally, utilizing a stitch marker can help maintain continuous spirals and achieve precise decreases and increases.
