


This pattern guide provides everything you need to know to create a crochet hummingbird, including recommendations for yarn and hooks, as well as fundamental crochet techniques. It includes step-by-step instructions for making this feathered friend, along with suggestions for customizing your project. Whether you are a novice or an experienced crocheter, this pattern will inspire your creativity and help you develop your skills.
Key Takeaways:
- Choose a soft, lightweight yarn such as acrylic or cotton for best results when crocheting a hummingbird.
- A size G or H crochet hook is recommended for this pattern.
- Understand crochet abbreviations and how to read a pattern to successfully create a crochet hummingbird.
- Create a magic ring to start your crochet hummingbird for a seamless finish.
- Follow the step-by-step instructions to crochet the body and wings, then assemble your hummingbird for a beautiful finished product.
- Experiment with different yarns and hook sizes to create a larger or smaller hummingbird according to your preference.
- Personalize your hummingbird by adding unique details such as embroidery or attaching beads for eyes.
- Enjoy the process of creating your own crochet hummingbird and have fun with it!
Materials Needed for Crochet Hummingbird
To crochet hummingbirds, you will need various materials, including different types of yarn, scissors, and plastic eyes, all of which contribute to creating a beautiful and durable finished product.
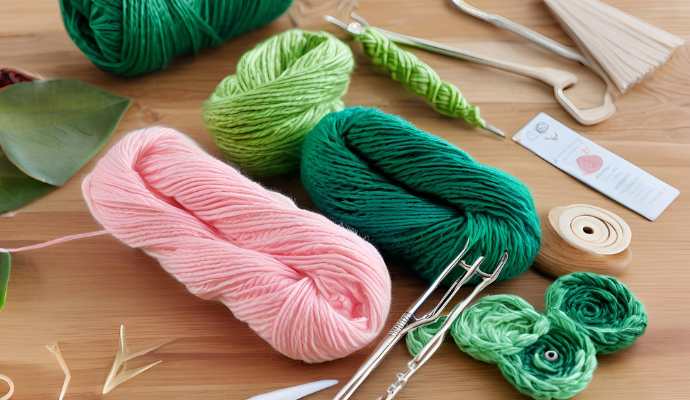
Suitable yarn options for crocheting hummingbirds include Premier Yarns or Red Heart Super Saver, with vibrant green yarn being ideal for depicting the bird’s natural colors. Scissors are essential for cutting yarn scraps, while plastic eyes provide a polished appearance to the amigurumi.
Be sure to gather all the necessary materials for crocheting hummingbirds and keep the appropriate crochet pattern on hand for easy reference throughout the process.
What Type of Yarn is Best for Crochet Hummingbird?
Choosing the right yarn for crocheting a hummingbird involves considering both the type and color, as both elements are essential for creating a realistic and vibrant finished piece. Premier Yarns and Red Heart Super Saver are among the top choices for crocheting hummingbirds due to their wide availability and extensive range of colors, including various shades of green, which are fundamental for replicating the appearance of real hummingbirds in nature.
Yarn Types for Hummingbirds in Crochet
Plus these two brands, there are other yarn options to consider, such as worsted weight, sport weight, or even lightweight yarn. Each type offers different textures that can significantly impact the final product. For example, fluffy and soft yarns can create a more delicate appearance, while smoother fibers can enhance finer details.
Yarn Colors and Hummingbirds in Crochet
Regarding color, selecting the perfect shades of green is crucial, as true-to-life variations can help replicate the iridescence of hummingbird feathers. A range of greens, from deep emerald to bright lime, can add depth and dimension to your work. Engaging thoughtfully with these choices can elevate your project, transforming it into a personal expression of the beauty found in nature.
What Size Crochet Hook is Recommended?
Selecting the appropriate crochet hook size is essential for ensuring the correct gauge and for ensuring that the crochet hummingbird pattern will work as intended.
Choosing a hook suitable for the yarn types you have selected will help guarantee that the design is well-structured and visually appealing. The size of a crochet hook significantly impacts the tension of the stitches, which in turn affects the overall appearance and functionality of the final product.
For example, using a smaller hook with thicker yarn creates tighter stitches, which can enhance durability but may also result in a stiffer finish. Conversely, using a larger hook with thinner yarn produces a more open stitch that is better suited for airy designs.
While standard sizes can vary, a 4 mm hook is typically recommended for worsted weight yarn, and a 5.5 mm hook is suggested for bulky yarns.
To determine the best fit for your project, it is advisable to create a swatch and make adjustments as necessary.
How to Read a Crochet Pattern
Understanding how to read a crochet pattern is an essential skill for crocheters, as these patterns provide step-by-step instructions for creating projects like a crochet hummingbird.
Crochet tutorials emphasize the importance of paying attention to crochet abbreviations, which can vary between patterns. Familiarity with these abbreviations helps crocheters navigate different stitches and techniques effectively.
Understanding Crochet Abbreviations
A crochet abbreviation list serves as a helpful guide for understanding crochet terms, enabling you to easily follow patterns and complete your hummingbird crochet project. Common crochet abbreviations, such as ‘dc’ for double crochet and ‘sc’ for single crochet, are frequently found in tutorials to introduce you to the specific language of crochet.
Although these abbreviations may seem daunting at first, they are simply shorter forms of terminology that help streamline the process. For instance, ‘hdc’ stands for half double crochet, which adds lovely texture, while ‘ch’ refers to chain stitches, the fundamental building blocks of many patterns.
Keeping a crochet abbreviation list nearby allows you to refer back to it as needed. Becoming familiar with common crochet abbreviations builds confidence and enhances your overall skill set. This list explains 30 of the most common crochet terms, though it is not exhaustive, as the language of crochet continues to evolve.
Here are some examples of crochet abbreviations and their meanings:
- AM or A.M.: Acronym for American (e.g., AM hook sizes and gauges)
- ALT: Alternate
- BL: Back loop(s)
- BO: Bind off or cast off
- BPHFP: Back post half double crochet
- CC: Contrasting color
- CH or CHS: Chain(s)
- CL: Cluster
- CR: Contrast (e.g., a contrasting color)
- CSOF: Color(s) right side out (with the wrong side of the fabric against the skin)
- DC: Double crochet
- DCR: Double crochet cluster
- DTR: Double treble crochet
This list continues with terms that indicate choices or options, such as “either/or,” which can be used to specify size or stitch descriptions. Overall, understanding these terms will enhance your crochet experience and give the power to you to tackle various projects with ease.
What is a Magic Ring?
A magic ring, or magic circle, is a crochet technique used to create a tight center for projects that begin with a circular shape, such as the crochet hummingbird pattern. This method allows for adjustable sizing and a clean finish, ensuring that the initial stitches are secure and neatly organized.
By using the magic ring technique, you can eliminate gaps at the center of your work, resulting in a more polished finish for items like amigurumi toys or flower motifs.
To create a magic ring, start by wrapping the yarn around your fingers to form a ring. Then, insert your hook underneath this ring, yarn over, and pull through to create a loop on your hook. Yarn over once more to make your first stitch inside the ring. After you have made the desired number of stitches, pull the yarn tail to tighten the ring.
This technique is particularly useful for projects that require a closed center, offering more versatility than traditional chain methods that can leave an unsightly hole.
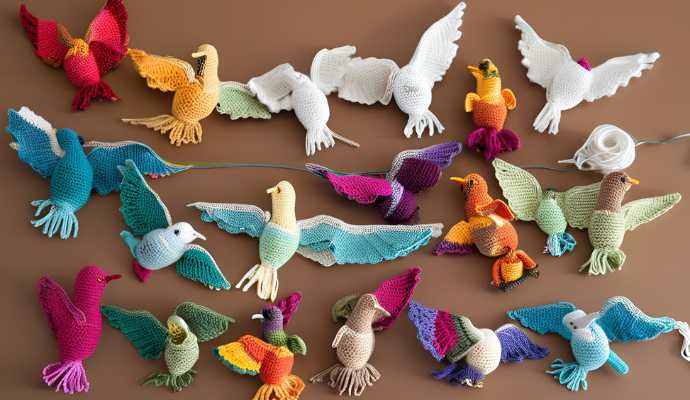
Step-by-Step Instructions for Crochet Hummingbird
Creating a crochet hummingbird involves a step-by-step process that begins with selecting patterns for the body, head, beak, tail, and wings.
Techniques such as the magic circle, increase stitches, and decrease stitches will be employed in assembling the entire piece.
The choice of yarn and hook size may vary depending on the design, but it is essential to select them carefully to achieve a vibrant and colorful finished result.
1. Creating the Body
To begin your crochet hummingbird, start by creating its body using a specific body pattern. You will make increase stitches to widen the body and decrease stitches to narrow it towards the head, ensuring a smooth transition.
Start with a magic ring and chain to establish the foundation. For the first few rows, use double crochet stitches to give the body a fuller shape, increasing evenly around the circle—typically every two or three stitches. You can find a great Free Crochet Hummingbird Pattern to help guide you through the process.
Aim for a smooth hourglass shape and gradually decrease as you approach the neck using single crochet stitches. Feel free to adjust the number of stitches based on the size you desire. This is also a great opportunity to experiment with colors and textures by changing yarns.
2. Making the Wings
Creating the wings of a crochet hummingbird is a fun and creative aspect of the overall project. By following a well-designed crochet pattern, you will learn how to shape the hummingbird’s wings using basic crochet techniques.
These techniques involve using the correct stitches, such as double crochet and slip stitch, to achieve a slender and elongated hummingbird wings shape. Additionally, employing shaping techniques like increases and decreases will help you form the curved points on the wings.
As the creator, you have the freedom to choose the colors and patterns for your design. You might opt for a classic gradient from top to bottom or a bold polka dot design. Each hummingbird you create will have its own unique character, just like a step-by-step pattern from a crochet along.
3. Assembling the Crochet Hummingbird
Assembling the crochet hummingbird is the final step in creating a striking finished piece, where all the individual parts are joined together. This process involves attaching the wings, the hummingbird’s head, and the intricate beak design, as well as adding plastic eyes to the piece. For more inspiration, you can explore hummingbird projects shared on Instagram Stories by fellow crafters.
- The first step of assembly is to attach the wings. Securely stitch the wings to the sides of the body, ensuring that each stitch is firm to prevent any loose parts.
- Next, attach the head to the body, making sure it is properly aligned and proportionate. Firmly secure the head with a few stitches.
- After that, attach the beak design.
To complete the assembly, you may use yarn stiffener if desired. Applying yarn stiffener to the wings will help maintain their shape and create a bolder wing display. You may also consider adding Polyfill to give the body a fuller look.
Tips and Tricks for Crocheting a Hummingbird
This crocheting hummingbird project includes a variety of tips and tricks designed to help beginners get started and creatively modify their work.
The project also suggests alternative yarns for the hummingbird and offers ideas for customizing your creation.
How to Make a Larger or Smaller Hummingbird
You can alter the size of your crochet hummingbird by selecting a different body pattern size and employing various crocheting techniques. By adjusting the yarn weight and hook size, you can easily create a larger or smaller version of your project while maintaining the overall design.
It is advisable to create gauge swatches to ensure that the size remains consistent and that the final product appears neat. This practice will help you determine how many stitches and rows are needed to achieve your desired dimensions.
To craft a smaller hummingbird, use thinner yarn and a smaller hook, which will result in tighter stitches and a more delicate appearance. Conversely, to create a larger hummingbird, opt for thicker yarn and a larger hook to produce bigger stitches.
Additionally, you can adjust the size by modifying the number of stitches or rounds in your crochet pattern.
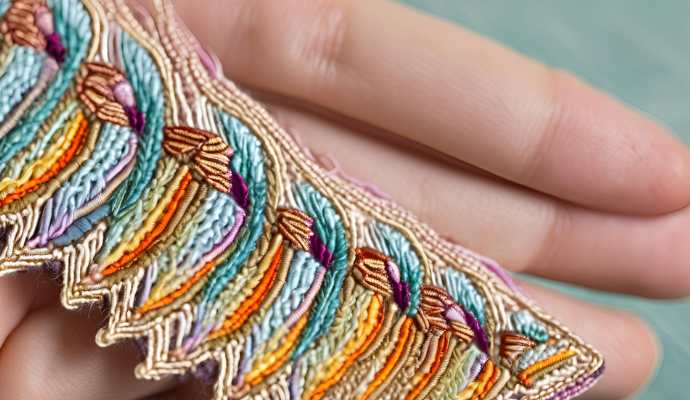
How to Add Details and Personalize Your Hummingbird
Adding details and personalizing your crocheted hummingbird can elevate your project and showcase your unique style.
Consider incorporating distinctive decorations, such as contrasting yarn colors, various textures, or even additional embellishments that reflect your artistic flair, like those shared in The Crochet Club or by popular creators like Carmen Crochet.
Experimenting with a range of yarn hues can create gradients or stripes that mimic the vibrant plumage of these enchanting birds. Adding beads or sequins can introduce a touch of sparkle, simulating sunlight glinting off their feathers.
You can also incorporate patterns like flowers or spirals to lend a whimsical touch and enhance the overall piece. Embrace your creativity by thinking outside the box, perhaps by using a textured stitch for the body or a delicate lace stitch for the wings!
Final Thoughts on Crochet Hummingbird Pattern
The crochet hummingbird pattern is an excellent project that allows crafters to enhance their skills and creativity while learning various crochet techniques. The enjoyment of creating such an intricate piece serves as a reward in itself. Check out March 2023 updates on YouTube channels like Crocheting with Nicki for recent patterns and ideas.
As you delve into your creative instincts with the pattern, you will also refine your craftsmanship by mastering delicate hummingbird wings and executing intricate color changes, among other techniques.
Crafters are encouraged to share their finished projects, as showcasing a unique interpretation can inspire others to embark on similar endeavors. Moreover, sharing projects fosters the exchange of tips, celebrates successes, and helps build a community centered around a shared passion for crocheting.
Frequently Asked Questions
What is a Free Crochet Hummingbird Pattern by Red Haired Amazona?
A Free Crochet Hummingbird Pattern by Red Haired Amazona is a set of instructions that allows you to create a crochet hummingbird without having to pay for the pattern. You might find Design CALs featuring these patterns on platforms like Ravelry.
Where can I find a Free Crochet Hummingbird Pattern?
You can find a Free Crochet Hummingbird Pattern or join a Design CAL online through various websites and blogs that specialize in crochet patterns, including pages dedicated to yarn choices and crochet techniques.
Are Free Crochet Hummingbird Patterns suitable for beginners?
Yes, there are many Free Crochet Hummingbird Patterns that are suitable for beginners. Look for patterns with clear instructions and simple stitches.
Do I need special tools or materials to make a Free Crochet Hummingbird Pattern?
Most Free Crochet Hummingbird Patterns will require basic crochet tools such as a crochet hook and yarn. Some patterns may also recommend specific yarns like Premier Yarns or Red Heart Super Saver and additional materials like beads or embroidery thread.
Can I sell items I make using a Free Crochet Hummingbird Pattern?
It depends on the specific pattern and the designer’s terms of use. Some patterns may allow you to sell items made from their pattern, while others may not. Designers like Red Haired Amazona often have clear guidelines. Always check the terms of use before selling any items made from a Free Crochet Hummingbird Pattern.
Are Free Crochet Hummingbird Patterns only for crocheting?
No, there are also Free Crochet Hummingbird Patterns available for other crafts such as knitting, embroidery, and sewing. Look for patterns that cater to your preferred craft method, and explore resources on Ravelry or related Instagram Stories for inspiration.
