


The crochet cow hat is a delightful project that not only adds a playful touch to your winter wardrobe but is also enjoyable to make and wear. This guide outlines the materials required for creating the crochet cow hat, provides step-by-step instructions for crafting this adorable accessory, details the crochet stitches involved in the project, and offers tips to enhance your crafting experience.
Key Takeaways:
- Use high-quality yarn for a durable and comfortable crochet cow hat.
- Follow the pattern carefully and use stitch markers to ensure accuracy in creating the hat’s features.
- Take breaks to avoid hand fatigue and enjoy the process of making a unique and adorable crochet cow hat.
What Is Crochet Cow Hat?
The Crochet Cow Hat is a free pattern designed by Sarah Zimmerman of Repeat Crafter Me. This adorable hat is perfect for newborns, toddlers, and preschoolers.
Typically crafted using chunky yarn, such as Red Heart Hygge, this pattern is both cute and easy to follow, making it accessible for crocheters of all skill levels. Its popularity is evident, as it has inspired over 222 projects and has been added to 364 queues on Ravelry and Etsy. It has an overall rating of 4.8 stars on Ravelry and is often featured on Instagram and other social media for its charming design.
What Are The Materials Needed To Make A Crochet Cow Hat?
To create a Crochet Cow Hat, you need specific materials to achieve the best results and a delightful finished product. Sarah Zimmerman recommends these materials in her free crochet pattern.
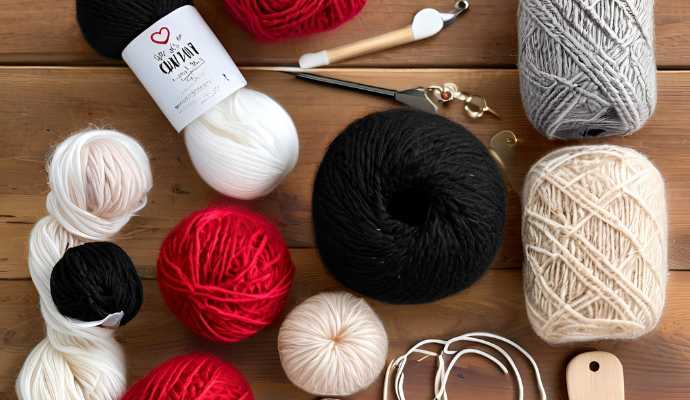
Essential materials include:
- Yarn—many crafters prefer the chunky Red Heart Hygge
- Scissors
- A tapestry needle
- A crochet hook
- A yarn substitute if you wish to use a different type of yarn for a unique look or feel
1. Yarn
The type of yarn you choose for a Crochet Cow Hat directly affects the finished product’s appearance, texture, and warmth. Acrylic yarn, such as Red Heart Hygge, is commonly used due to its durability and softness, making it an ideal choice for a baby hat project.
Exploring various yarn options for Crochet Cow Hats allows for creative expression and personalization. Selecting different colors enables you to create a hat that reflects your style or caters to the preferences of the baby who will wear it.
Using chunky yarn is another excellent option, as it works up quickly and offers a thick, soft texture that looks great. It’s important to consider the yarn’s weight to ensure it aligns with the specifications of your chosen pattern. Bulky weight yarn will result in a tighter finished product, which is perfect for a Crochet Cow Hat, often designed as a winter cap. If you prefer a thinner hat, you can choose a pattern that is appropriately sized for your baby or toddler. Yarn substitution can be used for a personalized hat that fits your needs.
Possible color combinations can range from neutral to bright, and combining both can create a whimsical design. For more yarn ideas, check the Ravelry library or Etsy download sections.
Lastly, be sure to check the care instructions for the yarns you select to maintain the softness and ease of cleaning of your finished product, ensuring it remains suitable for frequent use.
2. Crochet Hook
Choosing the right crochet hook is essential for creating the perfect Crochet Cow Hat. The size of your crochet hook can significantly impact the overall fit and texture of your finished project, so it’s important to refer to a size chart that matches the hook size to your yarn type.
Depending on whether you opt for chunky yarn or another variety, adjusting the crochet hook size can enhance the clarity of your stitches and help maintain consistent tension throughout the project.
For beginners, it is advisable to start with a medium-sized crochet hook, typically labeled as size H or I, as these sizes are most commonly used with basic worsted weight yarn. This combination is ideal for beginners, as it allows for easy learning of basic stitches while ensuring that projects have a uniform appearance. The average difficulty rating for this pattern is manageable for those at a beginner-friendly skill level.
Additionally, selecting a crochet hook made of aluminum or ergonomic plastic can enhance comfort, particularly during longer crochet sessions. Each material has its advantages and disadvantages:
- Metal hooks tend to slide effortlessly through yarn.
- Wooden hooks offer more friction, providing better control.
3. Scissors
Scissors are an essential tool for crochet projects, such as the Crochet Cow Hat, as they are used to cut yarn lengths and assist with finishing touches.
A high-quality pair of precision crafting scissors can enhance the experience, making the work easier and more enjoyable. The type of scissors used can significantly impact the overall quality of the finished piece, influencing both the ease of cutting yarn and the handling of delicate threads. For those looking for crochet resources, social media platforms like Instagram and Daisy Farm Crafters provide helpful tips on the best tools to use.
For crocheters, sharp, small, and pointed scissors—often referred to as embroidery or craft scissors—are recommended because they provide precise cuts in tight spaces.
Proper maintenance, including sharpening and appropriate storage, can extend the lifespan and performance of scissors. Investing in a good pair of scissors not only elevates the crafting experience but also ensures that the final products reflect the maker’s intent.
4. Tapestry Needle
A tapestry needle is essential for your Crochet Cow Hat, as it is used for weaving in yarn ends and sewing pieces together. Tapestry needles provide a clean finish by ensuring that all ends are properly handled, which enhances the appearance of your adorable hat. Tapestry needles are also necessary for adding poly-fil to stuffed elements if you choose to incorporate them.
If you wish to add earflaps or finish your custom colors, a tapestry needle offers the precision needed for a polished result. These needles can also be applied to both former and finished crochet pieces, elevating your project from a simple craft to an art form.
Choosing the correct needle size is crucial; using one that is too small for the yarn thickness can make the task difficult. For instance, thicker yarns are best paired with a larger needle, as this facilitates easier threading and movement through the yarn.
Employing proper techniques, such as weaving the needle through the yarn smoothly and loosely, can significantly enhance the look and quality of the finished piece. Some crafters share their completed crochet hat projects on social media, often using affiliate links to recommend their favorite tools and materials.
How To Make A Crochet Cow Hat?
The Crochet Cow Hat is a fun and rewarding project that enables crafters to express their creativity while creating a whimsical accessory.
This project typically involves following a crochet pattern that provides instructions for making earflaps, the main body of the hat, and the adorable facial features that give it a charming cow-like appearance. Many crafters share their completed projects on Instagram, tagging @RepeatCrafterMe for crochet inspiration and feedback.
For those who prefer visual guidance, video tutorials are available to assist with each step of the process. Beginners can follow along confidently and learn essential techniques such as the magic ring and single crochet, among others. Happy hooking!
1. Start With The Ear Flaps
The first step in creating your Crochet Cow Hat is to start with the ear flaps, which are essential features that add both warmth and cuteness to the design.
Following the crochet pattern closely, you will begin by making two separate ear flaps, typically crafted using a series of single crochets and chains. These ear flaps will form the foundation of the hat, providing a snug fit and adorable details that make the baby cow hat stand out. The pattern’s clarity rating is high, making it easy to follow even for those new to crochet.
To start, chain the appropriate number of stitches, which is usually around 10 to 15, depending on your desired size for each flap. Once your foundation chain is established, carefully work single crochets across it, paying close attention to your tension to ensure uniform stitch size.
When you’re ready to shape the ear flaps, decrease a stitch at the end of each row—typically after about five rows—to create a gentle tapering effect.
For beginners, a helpful tip is to check your tension frequently and adjust your grip if necessary, as even tension is crucial for achieving an attractive finished piece. Additionally, using a stitch marker can assist in keeping track of where your decreases occur, ensuring that your ear flaps maintain their structure as you progress. The inclusion of earflaps not only enhances the look but also adds functionality, making it perfect for winter use.
2. Create The Body Of The Hat
Once the ear flaps are completed, the next step in creating the Crochet Cow Hat is to make the body of the hat. The body forms the main structure and shape of the hat.
Following the crochet pattern, you will transition from the ear flaps to the body, typically using double crochet stitches (DC) to increase height and achieve a quick and easy finish. This stage is one of the more flexible parts of the crochet cow hat, allowing you to adjust the height and width based on the sizing needs for any baby, toddler, or preschooler. This unisex pattern is perfect for any child and makes a great gift.
To begin the body, it is recommended to create a foundation chain that corresponds to the desired size, usually consisting of 50 to 60 chains depending on the age group.
Once you have established the base, continue with double crochet stitches in each chain across the first row, then turn and repeat for additional rows. Beginners should aim for 10 to 12 rows for a snug fit, adjusting as needed for height.
If you wish to incorporate custom colors, you can alternate yarn every few rows or create stripes.
It is important to maintain even tension while crocheting, so be mindful of how tightly or loosely you hold the yarn. Testing your technique on a small swatch before starting the actual project will help you improve your skills and ensure consistency throughout the hat.
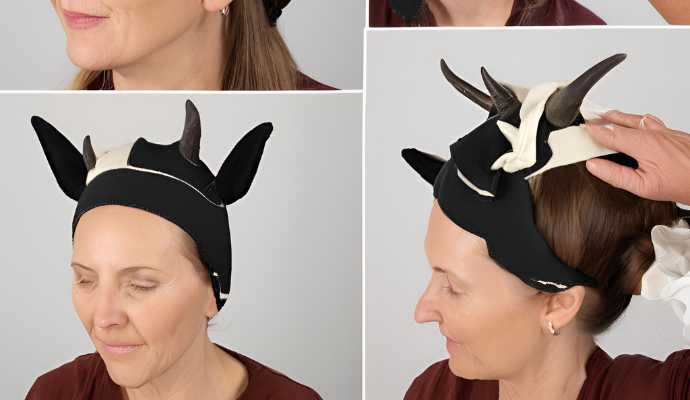
3. Add The Face Features
Adding facial features to your Crochet Cow Hat is where the magic happens, transforming a simple hat into an adorable work of art. By following the design elements outlined in the crochet pattern, you can incorporate charming details such as eyes, nostrils, and horns that give your baby cow hat character and appeal. Consider using techniques like the magic ring and treble crochet to create cute details that make your hat stand out.
This creative process allows for personalization, as you can select different colors and placements to make a personalized hat that matches your unique style or the preferences of the little one, whether a baby cow or toddler, who will wear it.
To achieve the best results, start by carefully planning the placement of each feature, ensuring they are symmetrically aligned for a balanced look. If necessary, lightly mark the spots with a fabric marker.
When attaching the pieces, use a strong crochet yarn or a hot glue gun, making sure to secure each feature tightly for durability during wear.
Feel free to mix and match colors for the eyes, adding a pop of brightness with contrasting shades to enhance the overall aesthetic of your crochet hat. You can also experiment with different textures or embellishments, such as buttons, felt, or even chunky yarn, to add depth and allow your crochet hat to truly shine and reflect your personal touch.
4. Finish With The Border
The final step in creating your Crochet Cow Hat is to add a border, which provides a polished and professional appearance. You can use stitches such as treble crochet or any stitch of your choice to create a defined border. This step is crucial for an adorable hat that stands out.
This step not only enhances the overall look but also secures the edges, ensuring that your adorable hat retains its shape and lasts longer. Start by selecting a yarn color that contrasts with the main body of the hat to make the border more visible.
As you work around the edge, you can opt for slip stitches for a tight finish or a scalloped stitch for a whimsical touch. Be sure to measure your stitches carefully to ensure they are evenly distributed along the border.
The border serves as a visual frame for the hat, and paying extra attention to this part of the process can significantly enhance the overall design, making it stand out as a professionally crafted item.
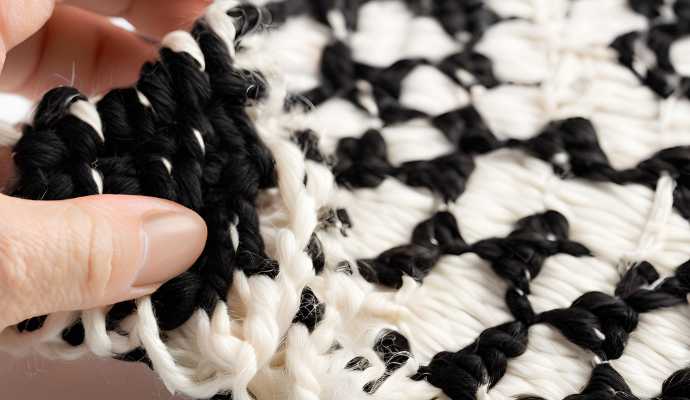
What Are The Different Stitches Used In Crochet Cow Hat?
The Crochet Cow Hat, an adorable hat for all ages, is crafted using a variety of crochet stitches, each adding to the unique texture and structure of the hat.
The primary stitches employed in creating a Crochet Cow Hat include:
- Single crochet for tighter areas,
- Double crochet for added height and volume,
- Treble crochet for decorative borders.
Slip stitches play a crucial role in achieving seamless joins, and each type of stitch presents its own challenges. With an overall rating of beginner-friendly difficulty, this project still offers enjoyable challenges for more experienced crocheters.
1. Single Crochet and Custom Colors
Single crochet is one of the most fundamental and important stitches in crochet, playing a vital role in the construction of the Crochet Cow Hat. This stitch is favored for its tight and dense nature, making it ideal for areas that require stability and structure, such as the ear flaps. Properly executing the single crochet stitch is crucial for achieving a polished and professional appearance in the finished garment.
To begin, carefully create a slip knot and chain the desired length. Next, insert the hook into the second chain from the hook, yarn over, and pull up a loop. With two loops now on the hook, yarn over again and pull through both loops to complete the stitch. Experimenting with custom colors can make your crochet projects more exciting.
It is essential to maintain even tension—neither too tight nor too loose—as this will influence the clarity of the pattern. A consistent single crochet stitch will contribute to a professional look and significantly enhance the overall quality of the crochet project.
2. Half Double Crochet
The half double crochet stitch is an essential technique used in the overall design of the Crochet Cow Hat. This stitch effectively balances the density of single crochet with the height of double crochet, making it suitable for various sections of the hat. By mastering the half double crochet technique, crafters can introduce texture and visual interest to their projects.
To perform the half double crochet, begin by creating a foundation chain of the desired length. Next, yarn over and insert your hook into the stitch, then yarn over again and pull through. At this point, you will have three loops on your hook. Yarn over once more and pull through all three loops simultaneously. This straightforward technique facilitates smooth stitch transitions, which is particularly beneficial when working on more intricate patterns like the Cow Hat.
Incorporating half double crochet stitches in key areas, such as the hat’s band or ear flaps, enhances the overall structure and snug fit of the hat, ensuring comfort while adding a fun, textured detail to the design.
3. Double Crochet
The double crochet stitch is a fundamental crochet technique that is commonly used in various crochet patterns and is essential for creating the Crochet Cow Hat. This stitch is taller and thicker than the single crochet, making it ideal for the hat’s body, where a wider and more airy fabric is desired.
To perform a double crochet, follow these steps:
- Yarn over.
- Insert the crochet hook into the designated stitch and pull it through.
- You should now have three loops on the hook.
- Yarn over again and pull through the first two loops on the hook.
- Yarn over once more and pull through the last two loops.
When crocheting a double crochet (abbreviated as “dc”), aim to execute the stitch in a smooth motion, ensuring that the tension is even throughout to avoid gaps or tight spots. A common mistake when double crocheting is twisting the stitch, which can create an uneven row. Beginners may also accidentally skip the stitch they intend to work into, resulting in uneven spacing.
In the Cow Hat pattern, the double crochet stitch contributes to a sturdy yet flexible body, allowing for the incorporation of color and texture changes. This feature enables the crocheter to add delightful details to the overall appearance of the Cow Hat.
4. Slip Stitch and Magic Ring
The slip stitch is a fundamental technique in crochet, playing an essential role in the creation of the Crochet Cow Hat. Often used for joining rounds or securing pieces together, the slip stitch provides a seamless finish that helps maintain the integrity of the design. Combine this with the magic ring technique to start your projects effortlessly.
Mastering the slip stitch is crucial for ensuring that your project appears professional and polished. This technique is particularly beneficial when transitioning between different elements of the hat, such as attaching the ears or joining the brim to the body.
By utilizing the slip stitch, you can create a clean line that enhances the overall visual appeal of the hat. Employing slip stitches at the end of rows gives a refined edge, preventing any awkward gaps.
For a neat finish, it is important to maintain consistent tension and select a yarn that complements the design’s colors. Remember, practicing this stitch will greatly improve the final look of the Cow Hat, ensuring that each detail is well-defined and charming.
What Are The Tips For Making A Crochet Cow Hat? Featuring Sarah Zimmerman’s Designs
Here are some essential tips for making a Crochet Cow Hat that will help ensure an enjoyable and successful project. Don’t forget to look up designs by Sarah Zimmerman on Repeat Crafter Me for crochet inspiration.
- Use Good Quality Yarn: Selecting high-quality, durable, and comfortable yarn is crucial for creating a Crochet Cow Hat.
- Beginner-Friendly Techniques: Utilizing beginner-friendly techniques can significantly enhance your experience while making the hat.
- High-Quality Patterns: Choosing patterns that are easy to read and follow is another important tip to keep in mind when crocheting your Cow Hat.
1. Use High-Quality Yarn
Using high-quality yarn when making a Crochet Cow Hat significantly impacts the appearance and feel of the finished product. Premium materials, such as Red Heart Hygge or Brava Bulky for chunky yarn projects, enhance the hat’s softness, warmth, and durability over time.
Substituting yarn based on personal preferences allows for unique color combinations and textures while still maintaining quality. When selecting yarn, it’s important to consider fibers that are both soft and resilient, such as those offered by brands like Cascade Yarns or Malabrigo.
Different types of fibers, such as cotton for breathability or acrylic for easy care, contribute to a more enjoyable crafting experience. A quick way to assess yarn quality is to check for evenness and smoothness in the strands; high-quality yarn typically results in a more polished finish, enhancing the overall look of the project.
Investing in premium yarn will yield a Crochet Cow Hat that not only looks great but also withstands wear and tear, making it a cherished accessory for many seasons to come.
2. Follow The Pattern Carefully
Following the crochet pattern closely is essential for the success of a Crochet Cow Hat. Whether you’re using a free crochet pattern or a detailed one from Ravelry or Etsy, each instruction serves a specific purpose, and adhering to these guidelines will enhance the clarity of your hat.
Rushing through the pattern increases the likelihood of making mistakes, so it is important to take your time and ensure that each stitch is made correctly and uniformly. If you’re looking for a fun project, check out this Crochet Cow Hat Free Pattern.
One effective way to stay organized is to use highlighters or markers to track the rows you have completed. Keeping all your materials, such as yarn and hooks, within reach will help you maintain focus by minimizing interruptions for supplies. Consider using a size chart for proper measurements.
Understanding the structure of the pattern, including the differences between increases and decreases, will enable you to visualize the project as a whole and follow along more easily.
By creating a workspace that fosters concentration, crocheters can significantly improve the clarity and design of their work, thereby reducing the chances of errors.
3. Use Stitch Markers and Crochet Resources
Stitch markers enhance both efficiency and accuracy when making a Crochet Cow Hat. Essential for maintaining stitch counts and marking specific locations in a crochet pattern, they prevent lost stitches and enhance the crafting of personalized hats like a baby cow hat.
Their usefulness becomes especially evident in complex patterns. By incorporating stitch markers into your crochet projects, you can significantly improve your overall crafting experience.
4. Take Breaks To Avoid Hand Fatigue While Crocheting
Taking breaks while crocheting is essential to prevent hand fatigue and maintain your enthusiasm throughout the process of creating your Crochet Cow Hat. This is particularly important when working with chunky yarn or creating complex elements like earflaps. If you crochet for extended periods, you may experience discomfort and strain, making it crucial to pause and stretch your hands and rest your fingers.
By balancing your crocheting time with regular breaks, you can stay relaxed and excited while working on your Cow Hat or any other crochet project. Aim to take breaks every 20 to 30 minutes. During these short breaks, gently shake out your hands or spend a few seconds doing quick wrist stretches. This is especially beneficial when using techniques like magic ring, single crochet, or double crochet.
Simple exercises, such as flexing your fingers or rotating your wrists, can significantly relieve discomfort. Using ergonomic tools, like those suggested by Sarah Zimmerman from Repeat Crafter Me, can also help reduce strain. Remember that crafting should be enjoyable, so trust your instincts and adjust your routine as needed.
Frequently Asked Questions
What is a crochet cow hat free pattern?
A crochet cow hat free pattern is a set of instructions that allows you to create a cow-themed hat using the crochet technique without having to pay for the pattern. These free patterns often provide crochet inspiration and happy hooking experiences with clear step-by-step guidance.
Where can I find a crochet cow hat free pattern?
You can find a crochet cow hat free pattern online through various websites and blogs that offer free crochet patterns. You can also find them in crochet communities and forums.
Do I need to be an experienced crocheter to use a crochet cow hat free pattern?
No, most crochet cow hat free patterns are designed for all skill levels. However, it is recommended to have basic knowledge and experience in crocheting before attempting to use a free pattern.
What materials do I need to make a crochet cow hat?
To make a crochet cow hat, you will need yarn in black and white, a crochet hook, scissors, and a tapestry needle. For a more adorable hat, consider using yarn substitution options like Red Heart Hygge or Brava Bulky for a soft and cozy finish.
Can I modify a crochet cow hat free pattern to fit different sizes?
Yes, most crochet cow hat free patterns can be easily modified to fit different sizes by adjusting the hook size and following the pattern instructions accordingly.
Do I have to use the specific yarn recommended in the crochet cow hat free pattern?
No, you can use any type of yarn as long as it is the same weight and the gauge matches the pattern instructions. However, using the recommended yarn will ensure the best results. Consider exploring yarn ideas from social media platforms like Instagram or crochet communities like Daisy Farm Crafters for more inspiration.
