


This guide will assist you in creating an adorable Winnie the Pooh crochet toy, making it suitable for both beginners and experienced crafters. It includes all the necessary information, ranging from essential materials such as yarn and hooks to a step-by-step process for crocheting each part, including the head, arms, legs, and more. Furthermore, it provides tips and tricks to ensure your Pooh turns out just right. Gather your supplies and embark on this delightful project!
Key Takeaways:
- You will need yarn, a crochet hook, stuffing, and scissors to make a Winnie The Pooh crochet.
- Knowing how to read a crochet pattern is essential for making the main body of the toy.
- Understanding stitches like magic ring, single crochet, increase, decrease, and continuous rounds is crucial for the body, arms, legs, head, and ears.
What Materials Do You Need? (Affiliate Links Included)
The materials refer to the supplies required for creating your own Winnie the Pooh-inspired amigurumi. The comforting character of the yellow bear can be crafted using a variety of supplies that will enhance the creative process and make it enjoyable. Make sure to check for easy-to-follow crafting patterns for an efficient and delightful experience.
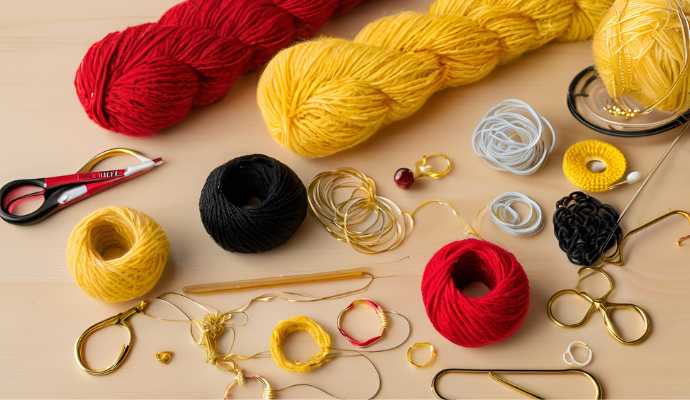
From the colorful yarn that represents Pooh and his furry friends in the Hundred Acre Woods to the crochet hook used to shape this adorable creation, each material plays a crucial role in making a plush toy that brings joy. Additionally, incorporating imaginative stories and whimsical language can add a unique touch to your creation.
1. Yarn and Black Medium Yarn
Yarn Choice: Selecting the right yarn for creating a Winnie the Pooh amigurumi is crucial to ensure that the final product has a soft and cuddly feel, mirroring the cozy essence of the beloved character from children’s literature. Utilizing black medium yarn for details like eyes or stripes can enhance the overall look of your plush toy, bringing your character to life.
Yarn Brand: Premier Parfait Chunky Yarn offers an excellent option for this project. This yarn is perfect for creating soft toys that children will cherish.
Features: This chunky yarn is not only plush and strong but also retains its shape well after use, making it ideal for toys that will be frequently handled. Its softness contributes to a pleasing texture against the skin, enhancing the overall cuddly experience.
Additionally, the variety of colors available, including a cheerful yellow, adds a whimsical touch to the design, perfectly reflecting Pooh’s joyful personality.
2. Crochet Hook
A crochet hook is an essential tool for crocheting, and selecting the right hook size is crucial to ensure that your Winnie the Pooh plush is both strong and adorable. Choosing the right size helps in crafting detailed and durable stuffed animals, making every stitch count.
Different hook sizes significantly impact the tightness of stitches, which in turn affects the overall appearance of the plush. A smaller hook creates tighter stitches, resulting in a stronger and more durable plushie, while a larger hook produces looser stitches, leading to a softer and fluffier toy.
For beginners, it is recommended to use a size I-9 (5.5 mm) or J-10 (6 mm) crochet hook, as these sizes provide a good balance with worsted weight yarns, making the crocheting process enjoyable and easy. These hooks are especially useful for creating adorable gifts and playful characters inspired by A.A. Milne’s timeless adventures in the Hundred Acre Wood.
Additionally, having a comfortable grip on the hook can make a significant difference during long crafting sessions by helping to avoid hand fatigue, which keeps the experience fun and creative.
3. Stuffing
Polyfil stuffing for amigurumi provides a plush feel reminiscent of the soft toys from childhood, which is essential for ensuring the best experience for users. This stuffing helps bring all your crafting projects to life, creating soft toys that offer a gentle hug. If you’re interested in making a classic toy, check out this Free Winnie The Pooh Crochet Pattern.
Among the various stuffing materials available for amigurumi projects, polyfil stands out for its softness and gentle texture, as well as its ability to maintain shape and durability.
To achieve the ideal cuddly appearance, it is crucial to stuff the amigurumi properly. Evenly distributed polyfil minimizes lumps and ensures a uniform shape throughout the body and limbs of the amigurumi.
By taking the time to carefully fill each area, crafters can create a delightful and huggable companion for both young and old alike.
4. Scissors
Scissors play a crucial role in crochet projects, and having a good pair is especially important for your Winnie the Pooh amigurumi. Using the right scissors ensures clean cuts and contributes to an overall enjoyable crafting experience.
Dull scissors can fray yarn, leading to frustration and potentially ruining hours of hard work. Crocheters looking to elevate their projects should invest in high-quality scissors, such as detail scissors or fabric shears.
Detail scissors are small and precise, making them ideal for trimming intricate areas, while larger fabric scissors effortlessly cut through thicker yarns. Choosing the appropriate type of scissors allows for sharp edges, enhancing the overall appearance of your crocheted piece and reducing the need for touch-ups, ultimately making the process more efficient and enjoyable. Additionally, using sewing pins to hold pieces in place while assembling your amigurumi can greatly improve your crafting experience.
How to Read a Crochet Pattern?
There are various methods for writing crochet patterns, but learning how to read a crochet pattern is an essential step in creating your own Winnie the Pooh amigurumi and other adorable gifts inspired by classic children’s books.
How to Crochet the Main Body?
The next step in creating a Winnie the Pooh amigurumi is to make the main body. This part will be constructed using basic crochet stitches that will be utilized throughout the entire process. Incorporating safety eyes will add a realistic touch to your amigurumi, giving it the quintessential look of a classic character.
1. Magic Ring
The magic ring is a fundamental technique in crochet that creates a tight center for your Winnie the Pooh amigurumi, ensuring that no gaps appear in the body structure. This technique is particularly essential for amigurumi projects, as it helps maintain a seamless and polished appearance, which is crucial for achieving a professional finish. Using a stitch marker can help keep track of your rounds, making the process easier and more organized.
To create a magic ring, start by making a loop with your yarn, leaving a long tail. Then, insert your hook into the loop and pull through a strand of yarn to create a slip knot. Once the loop is secured, crochet the desired number of stitches into the ring before pulling the tail to tighten it.
This method not only enhances the aesthetics of the plush but also improves its durability, resulting in a more structured and long-lasting piece.
Mastering the magic ring technique elevates your crochet skills and allows you to create intricate designs with confidence.
2. Single Crochet (sc)
Single crochet stitches are the foundation of many amigurumi creations, including your adorable Winnie the Pooh. This stitch provides a solid and plush texture that is perfect for cuddly toys. Not only does it contribute to the overall shape and structure of the project, but it also ensures durability, making it ideal for items that will be handled frequently. This type of stitch is often found in crochet patterns and is a favorite among those who enjoy making toys and other handmade gifts.
To begin, hold the yarn and hook firmly, ensuring that they are comfortable in your grip. Insert the hook into the desired stitch, yarn over, and draw a loop through. Then, yarn over again to complete the stitch. To maintain even tension, wrap the yarn consistently around your fingers; this small adjustment can significantly affect the final appearance of your project.
Finally, remember to count your stitches after each row to avoid any unintended increases or decreases, ensuring that your amigurumi retains its intended shape.
3. Increase
The round shape of your Pooh amigurumi’s body is achieved through a technique called increases, which involves adding extra stitches in each round. Increases are essential for allowing the toy to take on a more three-dimensional form while maintaining a smooth finish. This method is especially useful when swapping themes to create different characters from Disney stories, ensuring each plush has a unique and playful appearance.
In the first round, you can begin with a single crochet and then increase in every stitch, effectively doubling the number of stitches and creating a strong base. The subsequent round typically involves adding two single crochets in every other stitch.
For instance, to create Pooh’s belly, you would increase in rounds six and eight, which will result in a larger belly and contribute to the character’s signature round shape.
4. Decrease
The decrease technique is essential for shaping your Winnie the Pooh amigurumi, as it allows you to create a rounded form that gives the plush its charming character. Mastering this skill is crucial for achieving well-defined features and an aesthetically pleasing design.
For example, when shaping the head, strategically placing decreases towards the top and sides can help achieve that iconic roundness. During the final rounds of the head and the body, you may find yourself using the single crochet two together method, often abbreviated as sc2tog, to create a seamless transition.
This technique ensures that the transition from the head to the body appears natural and polished, enhancing the overall charm and cuteness of the amigurumi. Additionally, applying decreases evenly around the piece will prevent any awkward bulges, resulting in a smooth silhouette that characterizes a well-crafted plush toy.
How to Crochet the Arms and Legs?
The arms and legs are the final components to crochet for the Winnie the Pooh amigurumi. These features give the toy its character, allowing you to create a cuddly stuffed animal that evokes cherished childhood memories.
1. Chain Stitch
The chain stitch serves as the fundamental stitch for many crochet projects, including the arms and legs of your Winnie the Pooh amigurumi, providing a base for additional stitches. This foundational stitch not only acts as a base for numerous crochet projects but also plays a critical role in ensuring the overall structure and stability of the finished piece. Using a yarn needle to weave in ends can help achieve a neat and tidy finish, making your handmade gift look professionally crafted.
When constructing arms and legs for Winnie the Pooh and other amigurumi characters, the chain stitch allows for flexibility and precision, ensuring that the appendages maintain their shape. Maintaining consistent tension throughout the process is essential for achieving a neat and even chain stitch, contributing to the overall quality of your crochet pattern.
Avoid gripping your yarn too tightly, as this can result in uneven stitches. A relaxed grip will help ensure that the stitches are softer and more uniform, making the toy more comfortable for hugs and playtime.
2. Single Crochet
Crocheting the arms and legs of the Winnie the Pooh amigurumi using single crochet stitches ensures that they are both durable and adorable. This technique not only provides a cute, plush appearance and texture but also reinforces the structure, reducing the likelihood of sagging or ripping during playtime. Using high-quality yarns like Premier Parfait Chunky can make a significant difference in the final product’s feel and durability.
To begin crocheting the arms, start with a magic ring and work in single crochet rounds, making sure to have a total of 6 single crochets in the first round before increasing from there. For the legs, follow the same method, but remember to create a slightly wider base for better balance.
Employing shaping techniques, such as decreasing stitches toward the end of each limb, will give a tapered and realistic look, enhancing the overall durability of the plush and ensuring it can withstand hugs and adventures.
3. Slip Stitch
The slip stitch is a finishing technique in crochet that is ideal for closing off the arms and legs of your Winnie the Pooh amigurumi, providing a neat and professional appearance. This technique not only secures the pieces together but also minimizes visible seams, which can detract from the overall design. Adding polyfil stuffing prior to closing off can help maintain the desired shape and plushness of the stuffed animals.
By using a slip stitch, crafters can achieve a smooth transition between the different parts of the plush, making it look more cohesive and polished. This is especially important for amigurumi projects, where every detail contributes to the character’s charm.
Additionally, the slip stitch can be used to finish the edges, creating a seamless look that enhances the beauty of the completed piece, making it even more delightful to display or gift.
How to Crochet the Head and Ears?
Crocheting the head and ears of your Winnie the Pooh amigurumi is a process that enhances the character’s distinctive features and contributes to the creation of a unique toy inspired by classic children’s literature, bringing the whimsical language and gentle humor of A.A. Milne’s timeless adventures to life.
1. Magic Ring
The head of the Winnie the Pooh amigurumi begins with a magic ring, which creates a tightly closed center for building the rest of the features. This method helps prevent gaps that could detract from the overall appearance and allows for better control over the shape and size of the head.
To create a magic ring for the head, start by wrapping the yarn around your fingers to form a loop. Next, insert the hook into the loop and pull up a strand from behind. Yarn over and chain to secure the loop, then begin working your stitches into the ring.
As you pull the tail of the yarn, the magic ring will tighten, helping to shape the head and ensuring it maintains its form in the end. Ultimately, the finished toy will have a polished and professional look, showcasing the high level of detail that both makers and buyers appreciate.
2. Single Crochet
Single crochet stitches will form the foundation of the head and ears of your Winnie the Pooh amigurumi, giving it the plush texture that makes it so huggable. The consistency in these stitches is crucial for maintaining the character’s iconic look, whether it’s for a soft hug or display in a childhood room.
To achieve the desired shape, it is essential to maintain consistent tension throughout the process. This ensures that each stitch is uniform, contributing to a smooth and polished finish.
When crafting the head, aim for a circular form by gradually increasing your stitch count in the initial rounds to create a rounded base.
For the ears, use the same single crochet technique while slightly adjusting the stitch count to shape them effectively.
Remember to check your stitches regularly, as this practice helps maintain the intended size and shape, allowing your adorable bear to come to life perfectly.
3. Increase
The increase technique is essential for creating the rounded head and ears of your Winnie the Pooh amigurumi, ensuring that they achieve the desired shape of this beloved character. Using a crochet hook and yarn needle effectively during this process will help maintain the integrity and appearance of the toy.
Begin by making a magic circle with six single crochet stitches and continue working in a spiral. Gradually add increases every few rounds after every two to three stitches to help form a rounded shape.
For the ears, it can be beneficial to incorporate increases in the first few rounds before transitioning to a standard crochet pattern. This technique not only effectively aids in rounding out the shapes but also maintains the proportions true to the character’s friendly features.
By carefully balancing increases with standard stitching, you will complete your project, resulting in a charming and recognizable Winnie the Pooh.
4. Decrease
The decrease technique is essential for shaping the top of Winnie the Pooh’s head and ears, ensuring they achieve a smooth and rounded appearance that aligns with the character’s design. By carefully reducing stitches with a stitch marker, you can create a gentle curve that enhances the toy’s overall look and feel.
By carefully reducing the number of stitches while working in the round, one can create a gentle curve that reflects the iconic bear’s soft features. Thoughtful planning of the decreases is important; they should be spaced evenly across several rows to prevent abrupt changes that could disrupt the overall flow of the design.
For the ears, slight decreases at the base followed by a gentle increase help maintain their subtle rounded shape. This approach not only enhances the aesthetics but also contributes to the structural integrity, resulting in a clean finish that looks appealing.
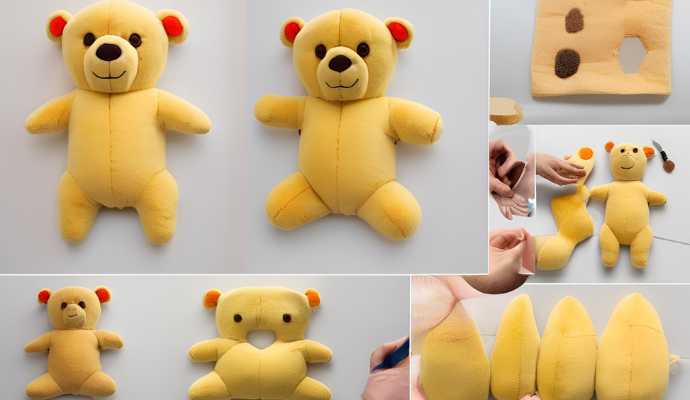
How to Assemble the Parts Together?
The final step in creating your Winnie the Pooh amigurumi is to assemble the various parts. This stage of the process is particularly exciting, as you witness your hard work come together and your creation transform into a plush toy that embodies the warmth of childhood memories and the comfort of a soft hug.
Tips and Tricks for a Perfect Winnie The Pooh Crochet
The best Winnie the Pooh amigurumi is one crafted not only using the techniques outlined in the patterns but also infused with creativity and individuality. Personal touches, such as using safety eyes and black medium yarn for detailing, can make your amigurumi truly unique.
This unique touch makes the project special, transforming it into a cherished handmade gift that evokes the joy of childhood. Whether it’s for a birthday or other special occasion, an adorable gift like this can be treasured for years to come.
Frequently Asked Questions
1. Can I really find a free Winnie The Pooh crochet pattern online?
Yes, there are many websites and blogs that offer free Winnie The Pooh crochet patterns for anyone to use, often including affiliate links to the recommended supplies.
2. Do I need to be an expert at crocheting to use a free Winnie The Pooh pattern?
Not necessarily. Some patterns may require intermediate or advanced skills, but there are also beginner-friendly patterns available for those new to making toys.
3. Are there different versions of the free Winnie The Pooh crochet pattern?
Yes, there are different versions and variations of the pattern available. Some may be more detailed and complex, while others may be simpler and easier to follow. Swapping themes and playful characters like Piglet, Tigger, and Eeyore can bring additional joy to your creative projects.
4. Can I use any type of yarn for the free Winnie The Pooh crochet pattern?
Most patterns will specify the type of yarn recommended, but you can always experiment with different types and colors to create a unique Winnie The Pooh. Using Premier Parfait Chunky yarn can add extra softness and durability to your creation.
5. Do I need to pay for the free Winnie The Pooh crochet pattern?
No, these patterns are available for free and should not require any payment. Be cautious of websites that claim to offer free patterns but ask for payment. Enjoy the simple pleasures of crafting without extra costs.
6. Can I sell items made from the free Winnie The Pooh crochet pattern?
It depends on the specific pattern and the designer’s terms. Some may allow you to sell finished products, while others may not. It is best to check the terms and conditions before selling any items made from the pattern. Adding your personal touches can also make each piece a unique, handmade gift that stands out in the market.
