


Get ready to unleash your creativity with this fun amigurumi crochet project: a delightful Ninja Turtle!
Perfect for fans of all ages, this guide provides everything you need to know, from selecting the right green yarn and yarn hook size to step-by-step instructions for crafting each adorable feature.
You’ll also find helpful tips for customizing your turtle and answers to common questions about the crochet pattern, including how to incorporate accessories like katana, nunchucks, or sai.
Whether you’re a beginner or a seasoned crocheter, this project promises joy and creativity in every stitch!
Key Takeaways:
- Choose the right materials: Use worsted weight yarn and a size G/4mm hook for best results.
- Follow the steps carefully: Create the body, head, arms and legs, and add details to the shell to complete your crochet ninja turtle.
- Get creative: Experiment with different colors and stitches to customize your turtle and make it stand out.
Materials Needed for Crochet Ninja Turtle Pattern
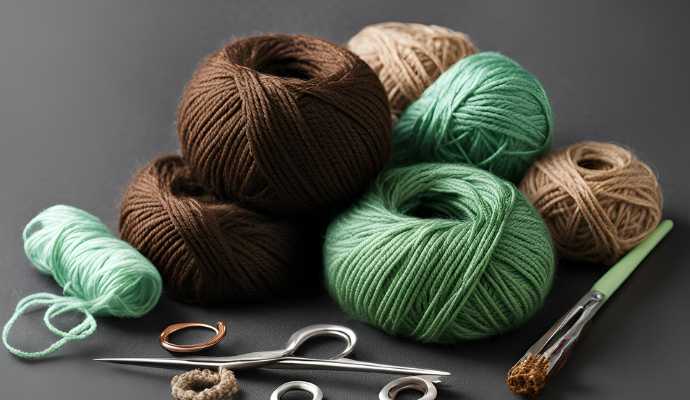
The materials needed to create your own Crochet Ninja Turtles play a crucial role in the crafting process, ensuring that it is both enjoyable and successful, especially for beginners.
To achieve the vibrant colors of Leonardo, Michelangelo, Donatello, and Raphael, high-quality yarn—such as Red Heart yarn or acrylic yarn in various shades—is essential.
Additionally, other necessary tools include:
- a yarn hook
- scissors
- a needle for precise stitching, such as attaching bandanas and belt buckles
These tools will assist you while crafting the turtles’ shells, bodies, arms, legs, and adding features such as elbow pads, wristbands, and kneepads.
What Type of Yarn Should You Use?
Choosing Yarn for Your Crochet Ninja Turtle Pattern
When selecting yarn for your Crochet Ninja Turtle pattern, it’s essential to choose the right type to achieve the desired look and texture. The choice of yarn will depend on the specific pattern and the aesthetic you aim to create, whether you’re going for a classic look or trying out free patterns.
Some popular yarn options for crocheting Ninja Turtles include:
-
- Amigurumi-style yarn for added softness and durability.
- Red Heart yarn, known for its durability and vibrant colors, particularly the necessary shades of green.
- Acrylic yarn is also an excellent choice due to its softness, ease of use, and attractive finish, making it well-suited for amigurumi projects.
- You might also consider cotton yarn or blends containing bamboo, which can offer different textures and finishes that enhance the overall appearance of your creations.
- Amigurumi-style yarn for added softness and durability.
Pros and Cons of Yarn Options
Red Heart yarn is one of the most commonly used brands for amigurumi because of its affordability and wide availability. However, some crafters prefer specialty yarn brands for their softer textures and unique color options. For example, cotton yarn serves as a popular substitute for amigurumi, as it creates a lighter and more breathable fabric, though it has less stretch compared to acrylic yarn. Additionally, using yarn blends containing bamboo can add a unique touch to these baby turtles.
When choosing yarn for your specific Crochet Ninja Turtle project, keep in mind that the type of yarn you select will significantly affect the final results. Be sure to consider both texture and color to achieve the best outcome.
What Size Hook is Recommended?
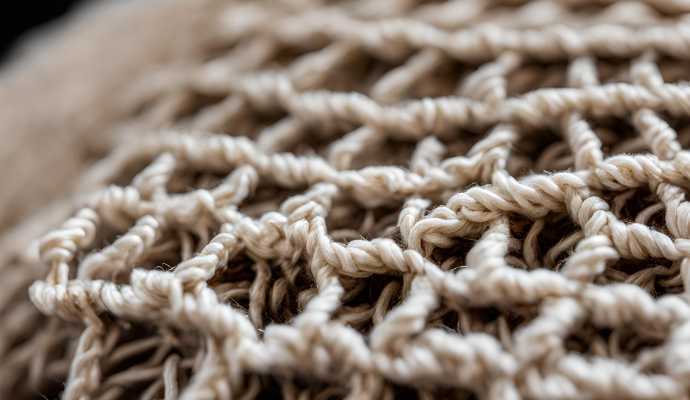
Choosing the right hook size for your Crochet Ninja Turtle pattern is essential, as it affects both the overall appearance and feel of the finished project. A common hook size for amigurumi is between 3.5 mm and 4.0 mm. This size creates tight stitches, ensuring that stuffing such as polyfill does not show through the project and providing the turtles with a stable, defined structure.
Using a hook that is too large can result in loose stitches, leading to a floppy and undefined shape, while a smaller hook may create overly tight stitches that detract from the yarn’s natural drape.
Additionally, hook size may need to be adjusted based on the type of yarn you are using. For example, cotton yarn typically works better with smaller hooks to achieve a firmer feel, while acrylic yarn may allow for more flexibility.
Depending on your personal tension, if you tend to crochet tightly, using a larger hook can create a softer, more fluid appearance in the finished turtles. Therefore, experimenting with different hook sizes can significantly impact both your crafting experience and the final product.
Other Supplies Needed
To complete your Crochet Ninja Turtle pattern, you will need several supplies, including:
-
-
- extra yarn for pizza decorations, like pepperoni and cheese.
- a yarn needle for assembly,
- scissors for trimming,
- stuffing (polyfill works well),
- safety eyes or black felt for facial features,
- and the colored bandanas and accessories that characterize the Ninja Turtles.
- extra yarn for pizza decorations, like pepperoni and cheese.
-
Additionally, having a set of stitch markers can be helpful for tracking your progress and ensuring uniformity. A measuring tape will assist in maintaining consistent dimensions, while a comfortable workspace with good lighting will allow the colors and details of your work to shine. Consider using safety eyes or black felt to create expressive ready eyes for your turtles.
Depending on the pattern, you may also require specialty yarn and specific color choices.
Step-by-Step Instructions for Crochet Ninja Turtle Pattern
The Crochet Ninja Turtle pattern is a delightful and detailed amigurumi project that allows you to create characters with distinct personalities, such as Leonardo, Donatello, Michelangelo, and Raphael, each skilled in the art of ninjutsu.
By following a well-structured tutorial step by step, you will learn both the basics and more advanced techniques while crafting the body, head, arms, and legs, as well as assembling the characters and crocheting their iconic shells.
Additionally, you will master important techniques such as the magic ring, single crochet, half double crochet, and more.
1. Creating the Body
The first step in creating your Crochet Ninja Turtle is to make the body, which serves as the foundation for your character. Begin by forming a magic ring and working in rounds using single crochet stitches to shape the torso, adjusting the size as needed to accommodate stuffing later.
It is essential to maintain even tension to create a firm and durable body that will hold its shape. This not only ensures that your turtle has a neat and finished appearance but is also critical for how well the stuffing will fit inside.
Once you have established the first few rows of the body, gradually increase the number of stitches to achieve a rounded shape. As you approach the desired height, begin adding your stuffing slowly and incrementally to avoid overstuffing, which can distort the shape.
Continue working in rounds while regularly checking the tightness and distribution of the stuffing, ensuring that the exterior remains smooth and even, as this is important for the final look of your character.
2. Making the Head
After completing the body, you will begin creating the head, which is the most defining feature of your Crochet Ninja Turtle. Start with a magic ring and gradually increase and decrease stitches as needed to maintain the head’s proportions with the body, shaping it to reflect the specific character of the turtle. Safety eyes and colorful bandanas, whether a color bandana or one styled after a pizza lover’s kitchen, will add personality and charm to your amigurumi’s head.
As you work on this piece of your creation, keep the following key factors in mind:
-
-
-
- Carefully count your stitches and adjust the width of the head to ensure proper proportions.
- Focus on the shaping, as the turtle’s distinct rounded forehead and jawline will contribute to its character.
- When adding facial features, securely place the safety eyes to prevent any hazards, especially if the creation is intended for young children.
- Additionally, consider using contrasting colors for the bandana; this not only enhances the overall appearance but also emphasizes the beloved identity of each turtle.
-
-
These details will truly transform the head into a festive focal point of your project.
3. Crafting the Arms and Legs
The arms and legs are essential for completing your Crochet Ninja Turtle, as they contribute both mobility and personality, each ready to wield their respective weapons like katana, nunchucks, or sai.
Each limb is created using a combination of single crochet and half double crochet stitches, and is lightly stuffed before being attached to the body during assembly.
Begin by using your preferred colored yarn to create a slipknot for the foundation chain. For each limb, crochet in rounds while maintaining consistent tension to keep the stitches even.
As you reach the desired length, introduce some fiberfill stuffing to give each limb a plump yet manageable appearance. During assembly, position the arms slightly outward and the legs straight down to ensure better balance.
Use a yarn needle to securely attach the limbs, making sure they are firmly in place while still allowing for a bit of movement.
4. Adding Details to the Shell
The iconic shell is a defining feature of your Crochet Ninja Turtle, and adding this detail requires careful stitching and creativity, just like crafting a pizza with the perfect balance of pepperoni and cheese.
Begin by crocheting the shell shape separately, using techniques such as increase and decrease stitches to achieve depth and texture. Once completed, securely attach the shell to the turtle’s back, enhancing the overall design with decorative elements that reflect each character’s personality.
For instance, when crafting Leonardo’s shell, consider incorporating a blue trim to symbolize his leadership and discipline, perhaps paired with a belt buckle. In contrast, for Michelangelo, you might choose vibrant orange accents, whimsical textures, and pizza motifs to capture his playful nature. Raphael’s shell could feature sharp, angular stitches to express his fierce personality, while Donatello’s might showcase intricate patterns and technological embellishments that represent his intelligence and tech-savvy skills.
After stitching the shells, use a whip stitch for a seamless attachment to the turtle’s body, ensuring durability, and finish with a few hand-sewn embellishments like black felt or ready eyes to add character-specific flair.
Tips and Tricks for Crocheting a Ninja Turtle
Ninja Turtle Crochet Tips and Tricks
To achieve the best results while crocheting your Ninja Turtle, consider the following tips and tricks:
Choose the Right Tension:
Tension is crucial for any crochet project, but it is especially important when creating amigurumi. Maintaining consistent tension throughout the project will ensure that the finished piece is uniform and retains its shape. Be aware that your tension may loosen as you continue crocheting; use your initial stitches as a benchmark. If you find your tension has loosened too much, consider switching to a smaller hook size or using a different yarn hook size to tighten it again.
Customize Your Character:
One of the most enjoyable aspects of crocheting Ninja Turtles is the opportunity for customization. You can modify the pattern to change the size of the turtle or create a variant of the character. Adding personal touches, such as different accessories or color schemes, like a red or blue bandana, allows for even more creativity. When making customizations, however, it’s important to keep the proportions of the turtle in mind.
Add Accessories:
Incorporating accessories is another fun way to make your Ninja Turtle unique. You can crochet additional items like a skateboard, pizza, or a weapon like a katana, nunchucks, or sai specific to the turtle you are making. Additionally, consider adding embellishments such as a mask or a bandana made from fabric.
Decorative Elements:
To enhance your Ninja Turtle crochet project, consider adding decorative elements. This can include features like eyes, teeth, or other facial characteristics that give your turtle more personality. Utilizing different yarn colors or patterns, such as green yarn or acrylic yarn, can also create unique designs and add visual interest to your work.
How to Make the Turtle Stand Up
One challenge when creating your Crochet Ninja Turtle is ensuring that it can stand upright and has a playful character. This issue can be addressed by using a heavier stuffing, such as polyfill, at the base of the body and carefully positioning the limbs during assembly to achieve an even weight distribution. Make sure to use secure knotting techniques and adjust the positioning of the legs during the assembly phase to help balance the turtle.
Experimenting with different types of yarn can also produce a variety of textures and weights that contribute to the overall stability of your Ninja Turtle. For example, using a thicker yarn will likely provide more structure than a thinner, lighter yarn, which may require more attention to weight distribution.
Aesthetic adjustments can be made by incorporating contrasting colors or patterns, enhancing the overall design without compromising functionality. Additionally, employing secure knotting techniques for limb attachment will strengthen the hold and ensure that the Ninja Turtle maintains its charming posture over time.
Ways to Customize Your Turtle
Personalizing your Crochet Ninja Turtle adds creativity and character to your project, providing an opportunity to make it truly unique. You can customize your turtle by using different colors of yarn for the body, selecting various colors for the bandanas, and adding accessories such as elbow pads, wristbands, nunchucks, or a katana that reflect each turtle’s personality.
Consider using different materials for these accessories; for example, felt for elbow pads can give a textured look, while lightweight fabric for weapons makes them easy to handle. You can also experiment with various textures by combining cotton yarn with acrylic for added fun.
The beauty of personalization lies in the freedom to let your imagination run wild. Whether you choose to add a humorous sidekick or vary the design of the shells, every choice contributes to creating a one-of-a-kind piece.
Frequently Asked Questions about Crochet Ninja Turtle Pattern
The following FAQs regarding the Crochet Ninja Turtle project address questions about the pattern, skill level, selling opportunities, and more.
This section aims to clarify what you can expect from this amigurumi pattern, as well as any factors you should consider when creating your turtles.
What Level of Crochet Experience is Needed for this Pattern?
The skill level required for crocheting a Ninja Turtle pattern can vary based on the intricacies of the design and the techniques involved. Generally, this pattern is suitable for intermediate crocheters who are familiar with basic stitches such as single crochet and half double crochet, as well as techniques like the magic ring. Advanced techniques like decrease and increase stitches may also be required for shaping.
Intermediate crocheters should also be comfortable with color changes and working in the round to effectively create the characters. Understanding how to read patterns is essential, as this project may include detailed instructions and possibly charts.
For beginners looking to advance their skills, numerous online resources are available, including video tutorials and community forums that offer guidance and support. Websites like YouTube feature countless instructional videos, while crochet blogs provide step-by-step patterns and tips specific to amigurumi, ensuring that both new and experienced crocheters can successfully tackle the Ninja Turtle project.
How Long Does it Take to Complete a Ninja Turtle?
The time required to complete a Crochet Ninja Turtle can vary significantly based on your crochet speed and the level of detail in the design. On average, an experienced crocheter may spend between 4 to 8 hours finishing one turtle, including time for assembly and decoration.
Factors such as yarn thickness, hook size, and individual skill level greatly influence the overall completion time. Beginners may find that intricate patterns or multiple color changes slow down their progress, while seasoned crocheters can tackle similar designs with greater ease.
To effectively manage your time, setting small goals for each session can help maintain focus and motivation. Additionally, using stitch markers and keeping an organized workspace can streamline the crocheting process, ultimately leading to efficient completion without compromising the quality of the finished project.
Can I Sell Items Made from this Pattern?
If you intend to sell items made from the Crochet Ninja Turtle pattern, it is essential to understand the guidelines and legalities involved. Typically, patterns are intended for personal use, but the ability to sell finished products often depends on the specific rights granted by the pattern’s creator.
To navigate this landscape effectively, you should carefully read the terms of the pattern rights as outlined by the designer. Many creators provide clear guidelines on how their designs may be used commercially, which may include requirements such as crediting the original artist or obtaining a written license.
Additionally, you must adhere to local regulations regarding sales and taxes, as artisans are often subject to zoning laws, business licensing, and tax obligations.
Following best practices, such as ensuring the quality of each handcrafted item and providing clear descriptions and images in online marketplaces, can significantly enhance the credibility and appeal of your handmade products.
Frequently Asked Questions
What is a Free Crochet Ninja Turtle Pattern?
A free crochet ninja turtle pattern is a set of instructions that guides you through creating a crochet toy inspired by the popular Teenage Mutant Ninja Turtles franchise. It includes a list of materials needed, step-by-step instructions, and a pattern to follow for creating the toy. This pattern often uses techniques like single crochet, half double crochet, and the magic ring.
Where can I find a Free Crochet Ninja Turtle Pattern?
There are many websites and blogs that offer free crochet patterns, including those for Ninja Turtles. You can also search for patterns on social media platforms like Pinterest and Instagram, or watch a detailed tutorial on YouTube for step-by-step guidance.
Do I need to have advanced crochet skills to create a Free Crochet Ninja Turtle Pattern?
Not necessarily. There are patterns available for all skill levels, including beginners. However, some patterns may require knowledge of basic crochet stitches, so it’s best to check the difficulty level before starting.
What materials do I need for a Free Crochet Ninja Turtle Pattern?
The materials needed may vary depending on the specific pattern, but generally you will need yarn in different colors, a crochet hook, stuffing, and possibly safety eyes or buttons for the turtle’s eyes. Specific materials might include green yarn for the body, black felt for the eyes, and a yarn needle for stitching parts together.
Can I sell items made from a Free Crochet Ninja Turtle Pattern?
It is best to check the terms and conditions of the specific pattern you are using. Some patterns may allow you to sell items made from their pattern, while others may have restrictions.
Are there different variations of Free Crochet Ninja Turtle Patterns?
Yes, there are many different variations of crochet ninja turtle patterns available. Some may be more realistic, while others may have a more cartoon-like appearance. There are also patterns for different sizes, from small keychain toys to larger stuffed animals. These variations can include different accessories like a belt buckle or kneepads to further customize your Ninja Turtle.
