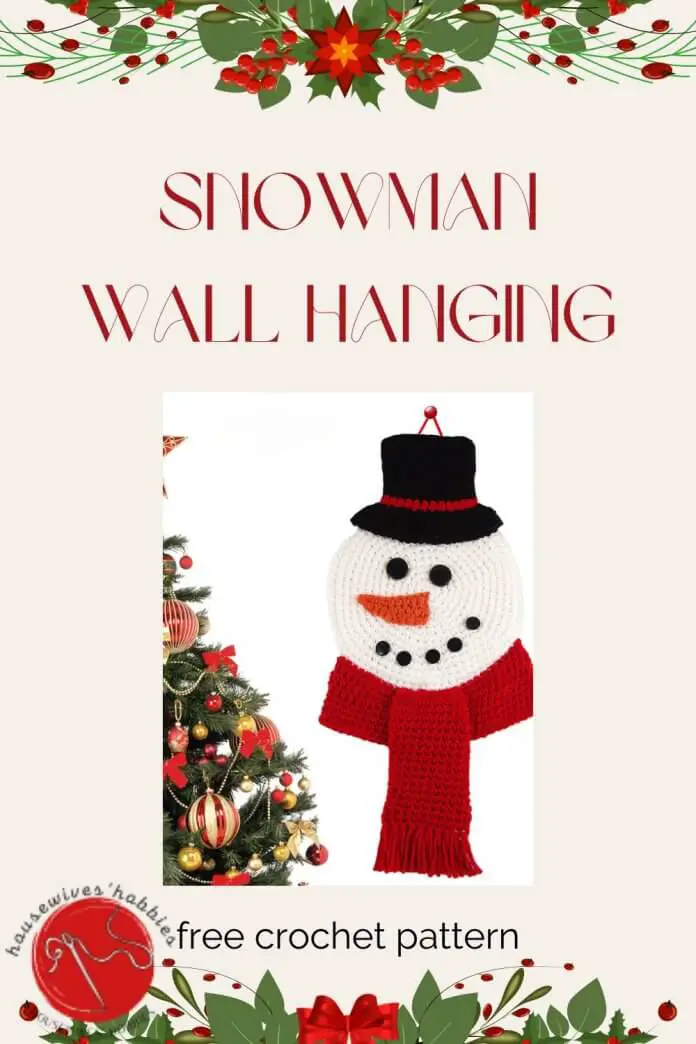
The free crochet pattern Snowman Wall Hanging is a delightful crochet project perfect for adding a touch of holiday cheer to your home. This pattern allows you to create a flat snowman motif that can be used as a decorative wall hanging or a welcoming sign on your front door. The pattern is considered easy, making it suitable for crocheters looking to practice color changes without feeling overwhelmed.
Materials Required:
- Crochet Hook: I/9 or 5.5 mm hook
- Yarn Weight: Medium Weight/Worsted Weight and Aran (16-20 stitches to 4 inches)
- Multiple colors of yarn for the snowman and its accessories
Skill Level:
- Easy: This pattern is designed for those who have a basic understanding of crochet techniques and are comfortable with color changes.
Finished Size:
- The exact finished size is not specified in the provided search result. However, based on the materials and hook size, it can be inferred that the finished wall hanging will be of a moderate size suitable for door or wall decoration.
Special Techniques Used:
- Color changes within the same piece and for separate pieces that are sewn together at the end
- Working in a spiral for rounds, using a stitch marker to track the first stitch of each round
- The pattern includes a note that if a round or row has a beginning chain, it does not count as a stitch
Full Materials List
- Red Heart With Love worsted weight yarn in: White, Holly, Berry, Black, Mango
- 5.5 mm (I-9) crochet hook or size needed to obtain the gauge
- 1″ Black buttons (2)
- ½” Black buttons (5)
- Poly fiber fill (optional)
- Stitch markers
- Yarn needle
Free Crochet Pattern Snowman Wall Hanging
Crochet Top Hat
Round 1: With Black – Chain 15, single crochet in second chain from hook, single crochet in next 12 chains, make 2 single crochets in last chain. Working the other side of the chain: single crochet in next 13 chains, do not join (28)
Round 2: Single crochet in each stitch around (28)
Round 3: Single crochet two together, single crochet in next 12 stitches 2 times (26)
Round 4 – 13: Single crochet in each stitch around (26)Secure the working loop of Black. Join Red in first stitch.
Round 14: With Red – Chain 1, single crochet in each stitch around, do not join (26)
Round 15: Single crochet in each stitch around, slip stitch in first stitch, fasten off (26)Continue with Black yarn from Round 13.
Round 16: With Black – Single crochet in first stitch, make 2 single crochets in next stitch, repeat between * around, do not join (39)
Round 17: Single crochet in first 2 stitches, make 2 single crochets in next stitch, repeat between * around, do not join (52)
Round 18: Single crochet in each stitch around, do not join (52)
Round 19: Chain 1, half double crochet in each stitch around, slip stitch to join in first half double crochet (52) Fasten off, leaving a lengthy tail for sewing.
Nose
Row 1: With Mango – Chain 11, slip stitch in second chain from hook, single crochet in next 3 chains, half double crochet in next 3 chains, double crochet in last 3 chains, turn (10)
Row 2: Chain 2, double crochet in first stitch, double crochet in next 4 stitches, single crochet in next 3 stitches, slip stitch in last 2 stitches (10)Fasten off, leaving a lengthy tail for sewing.
Head
Make 2
Round 1: With White – Chain 2, make 6 single crochets in the second chain from hook, do not join (6)
Round 2: Make 2 single crochets in each stitch around (12)
Round 3: Single crochet in first stitch, make 2 single crochets in next stitch, repeat around (18)
Round 4: Single crochet in first 2 stitches, make 2 single crochets in next stitch, repeat around (24)
Round 5: Single crochet in first 3 stitches, make 2 single crochets in next stitch, repeat around (30)
Round 6: Single crochet in first 4 stitches, make 2 single crochets in next stitch, repeat around (36)
Round 7: Single crochet in first 5 stitches, make 2 single crochets in next stitch, repeat around (42)
Round 8: Single crochet in first 6 stitches, make 2 single crochets in next stitch, repeat around (48)
Round 9: Single crochet in first 7 stitches, make 2 single crochets in next stitch, repeat around (54)
Round 10: Single crochet in first 8 stitches, make 2 single crochets in next stitch, repeat around (60)
Round 11: Single crochet in first 9 stitches, make 2 single crochets in next stitch, repeat around (66)
Round 12: Single crochet in first 10 stitches, make 2 single crochets in next stitch, repeat around (72)
Round 13: Single crochet in first 11 stitches, make 2 single crochets in next stitch, repeat around (78)The increases on the next two rounds are staggered to give the circle a more rounded shape.
Round 14: Single crochet in first 4 stitches, make 2 single crochets in next stitch, single crochet in next 12 stitches, repeat between * around (84) – Your last repeat section will end with 8 stitches instead of 12.
Round 15: Single crochet in first 8 stitches, make 2 single crochets in next stitch, single crochet in next 13 stitches, repeat between * around (90) –
Your last repeat section will end with 5 stitches instead of 13.Head Piece # 1: Slip stitch in next stitch and fasten off.At this point, I pinned the hat in place at the top of Piece # 1 so I could configure the placement of the eyes, nose, and mouth. I then sewed the face parts only in place before continuing with Head Piece # 2.Head Piece # 2: Do not fasten off.
With wrong sides facing, hold piece # 1 and piece # 2 together. Working through both layers of the outer round: Single crochet in each stitch back to start, join in first single crochet. If preferred, you can lightly stuff the head with poly fiber fill before sealing it up completely.
Fasten off.
You can now sew the hat on top of the head. Place the seamed head pieces between the two brim layers of the hat and use the hat tail to sew through all 4 layers, going across the whole length of the brim.


